Wednesday, December 21, 2011

chocolate cinnamon bundt cake with mocha icing

this past weekend my mom had her hanukkah party (yes, we had our hanukkah party before hanukkah started and yes we also lit all the candles in the menorah...that's how we roll) and she asked if i wanted to bring dessert. of course! my thought process:
  • make something that can feed about 10 people (and not cookies cause i made cookies for gifts)
  • got any kitchen toys that i have yet to use? yes i do! hi there new bundt pan!
  • make something blog-able (see? i do still think you you poor neglected blog baby)
so i went to my homemade magazine-clipping cookbook and came up with this: chocolate cinnamon bundt cake with mocha icing drizzle. ummm yes please! i made it vegan (obviously) and added applesauce for half of the oil and ended up with a really fantastic cake. it's super moist with a little bit of a chewy crust, kind of like a brownie cake and that is a very good thing! and it has some flavor depth from the cinnamon and espresso to take a little further than just plain old good chocolate cake.

i'm so out of blogging practice that i baked this cake and then totally flaked on taking a pertty picture of it, and because there is no photographic evidence i really don't even have to tell you about the, um, less then perfect removal of cake from pan. despite the brand new nonstick pan and the light coat of oil it was not a seamless flip. in fact, the whole top of the cake decided it was perfectly happy in the pan, thank you. i think this could be due to not letting it cool long enough before flipping (the recipe says 10 minutes...i will advise 20). so i pulled out the top bits, smooshed them back onto the bottom half, tried to tell myself it looked fine, knew it really showed it's smooshed-togetherness and then realized i could just flip it over and make the bottom the top, or the top the top (all this flipping and inverting has me confused!) and no one would be the wiser.

chocolate-cinnamon bundt cake with mocha icing

(probably from bon appetit...)
ingredients:
1 cup boiling water
1/2 cup unsweetened cocoa powder
4 teaspoons instant espresso powder, divided
2 cups flour
2 teaspoons baking powder
2 teaspoons cinnamon
1 teaspoon salt
2 1/2 cups packed brown sugar, divided
1/2 cup vegetable oil
1/2 cup unsweetened applesauce
1 tablespoon vanilla extract
2 tablespoons cornstarch mixed with 6 tablespoons water
1 1/4 cup semisweet chocolate chips
1/4 cup vegan margarine

preheat oven to 350, brush a 12-15 cup nonstick bundt pan with oil.

whisk 1 cup boiling water, cocoa powder, and 2 teaspoons espresso powder.

whisk 2 cups flour, baking powder, cinnamon and salt in a bowl.

using a mixer, beat 2 cups brown sugar with the vegetable oil, applesauce and vanilla in a large bowl to blend. add cornstarch mixture and blend until smooth. beat in half of the flour mixture then the cocoa mixture and then the remaining flour mixture until blended. fold in 1 cup of chocolate chips and pour batter into the bundt pan.

bake about 50 minutes, until a tester comes out clean. cool for 20 minutes in the pan then invert onto a cooling rack and cool 15 minutes longer.

meanwhile stir remaining 1/2 cup brown sugar, 2 teaspoons espresso powder and 2 tablespoons water in a small saucepan over medium heat until the sugar melts. remove from heat and add the margarine and 1/4 cup chocolate chips and stir until melted. drizzle the icing over the cake and let cool then serve!

i didn't use all of the icing....the rest is going on top of ice cream. yum!

happy holidays everyone!

-d

Tuesday, November 22, 2011

thanksgiving preview


no, this picture of alfonzo has nothing to do with thanksgiving but i don't have pictures of my thanksgiving food yet and a pictureless post is no fun so i give you alfonzo gazing at the chattahoochee. and it's fall. it works. on we go!

reasons why i am super crazy excited about thanksgiving this year:
1. for the first time in, oh probably 10 years, I DON'T HAVE TO TRAVEL
2. we were able to shop on sunday instead of having to go the day before thanksgiving (though it didn't seem any less crazy)
3. i get to start cooking...today!

thanksgiving has always been my favorite. a holiday all about spending time with family and friends, cooking a ton an eating? yes please! we always spend thanksgiving in atlanta so this year seems extra special now that we live here. we get to skip the whole travel part and get straight to the good stuff. we went to the farmers market on sunday and loaded up and today i begin my three day cooking extravaganza. i'm psyched.

we're having my dad over for brunch in the morning and then in the evening we'll head over to my mom's house for dinner. obviously i had to go overboard and decided to make 654651 different things. here's what i'm cooking:
for breakfast:
bagels
scones
coconut bacon
maaaaaybe white bean/tempeh sausage patties
and diddy will bring fruit cause i guess we need something besides bread products

for dinner:
kris will make amazing hummus (cause that's what he does) for appetizer time
quinoa fritters for appetizer time
these green beans
this cauliflower
rye pumpernickle stuffing
a mushroom/lentil/walnut thing
biscuits
and pumpkin pie

phew! and of course there will be the usuals like mashed potatoes and cranberry sauce but mama's taking care of those things.

i wrote out a cooking plan for myself and today's agenda is...
1. make bagels (rising as i type. i make so many bagels these days i could do this with my eyes closed)
2. assemble the stuffing (to bake on thursday)
3. make aioli for the fritters
4. make the pumpkin pie to allow for plenty of setting time
5. make the scone dough and freeze it for baking on thursday morning

wednesday is more prep and then thursday is baking and last minute things.

easy peasy.

so that's my thanksgiving plan. what's cooking for you guys?

-d

Wednesday, October 19, 2011

ferry building tofu sandwich


first off, why are sandwiches so hard to photograph? hmph.

anyway! what you see above is my most favorite sandwich. perhaps i've mentioned it before but it doesn't hurt to discuss again. in san francisco i would often (as often as i could) walk to the ferry building for lunch for this sandwich from frog hollow farm. and it felt like a special treat every time. what you have is braised tofu and baby gem lettuce sandwiched between two slices of acme bread - one spread with mashed avocado and the other with frog hollow's peach chutney giving this baby the perfect balance of sweet and savory. it was also a perfectly sized sandwich which i appreciate. the $8 price certainly doesn't make this suitable for daily consumption but it's worth every penny. naturally, my last lunch in san francisco was this sandwich...as well as a bit of scream sorbet (don't even get me started...just look it up and find it if you can) since it was farmer's market day and i was saying farewell. on that last trip i also picked up a jar of the peach chutney to carry across the country so i could recreate the amazingness upon arrival. well that day finally came and i must say i was not disappointed! i could close my eyes an imagine i was sitting by the bay feasting on the real deal.


frog hollow farm braised tofu sandwich...ATL style!
ok, so it's a sandwich not a science. roughly, here's whatcha gotta do. get your hands on some peach chutney (frog hollow if you can). marinate some tofu slabs in a mixture of soy sauce, cider vinegar, olive oil and crushed garlic. let it sit for as long as you like then pan fry it. mash up an avocado. get some good looking lettuce. smack it all together and enjoy. oh you will enjoy.

a side note, we bought a stalk of brussels sprouts to grill for a side. this is fitting because i often longed to buy one of these stalks while i was at the farmers market on my sandwich outing but i never bought one. i don't know...i guess i had reservations about being the girl on the train at rush hour with a gigantic stalk of brussels sprouts. glad we finally got one though, it was pretty fun snapping them all off. plus it's pretty.


-d

Sunday, September 18, 2011

sometimes we are really fancy...


last week kris and i celebrated out two year wedding anniversary with a fancy pants dinner at woodfire grill. top chef fans may know that woodfire is kevin's (from season 6) restaurant. i know he's super bacon dude but please recall he also won the natalie portman vegan challenge. when i called to make a reservation i mentioned that we are vegetarian and vegan and they said thanks for the notice, no problem! and is it a special occasion? well since you asked....

i was blown away by food and dining experience. we opted for the vegetarian and vegan 5 course tasting menu and our waitress was so sweet she took notes on all of our dishes, typed out our customized menus and mailed them to us. we ordered a bottle of wine that the sommalier suggested - Gamay Joulienas - it had something to do with beaujolais and it was incredible. it tasted like strawberries in the best way. then we started in with our 5 courses plus and amuse and taste of a shot of soup. it was all delicious but i think my favorite was my second course which was a super flavorful pumpkin mushroom dish. you can see the descriptions on the picture of my menu (or maybe you can't...), the only thing is it has the regular dessert (kris said it was yummy yummy!) my dessert was strawberry rhubarb sorbet with cocoa nibs and sun dried cherries (i think).

as if you can't tell i was really impressed with my vegan creations from woodfire. they are by no means a vegetarian/vegan restaurant and i really feel like they put some thought and love into our dishes and didn't just throw some random vegetables together and call it a day. i remember reading one vegan food writer say that the best vegan meal he ever ate was at the french laundry and i kind of felt like this was our french laundry experience (unless we one day get really really fancy and make it there...). great atmosphere and delicious vegan food where you might not expect it.

we're still working on finding our go-to spots here in atlanta but i think it's safe to say that we have found our special occasion spot. thanks, woodfire!

-d

Wednesday, August 31, 2011

chickpea remoulade patties


i got to make dinner last night! due to my funky work hours this doesn't happen often so i get pretty excited when i get to let loose in the kitchen and concoct a weeknight meal.

but backing up a bit, this dinner actually began on take shape on sunday when we made these tempeh crabcakes. perhaps we're just light remoulade-ers but we had a lot left over. so here's what you need to do. first make the tempeh crabcakes (because they are amazing) and then the next night dredge some tofu slabs in the remoulade then in bread crumbs then pan fry for super simple weeknight deliciousness. and then after that use up the rest with this with this easy peasy little recipe. all it takes is some mashing and mixing and patty forming and you're in business. i baked them (but you could certainly fry them as well if you want a bit more crunch) and then served them atop a pile of garlicky, smokey sauteed kale (you could also go the sandwich route). i love the tangy-ness from the remoulade and it's so flavorful that it pretty much takes care of all the seasoning you need (to be honest i just threw in the paprika because it felt like cheating to not add anything else to season. plus i like paprika) and the chickpea/polenta combo gives these a hearty but not heavy texture.

chickpea remoulade patties
ingredients:
1 can chickpeas, drained and rinsed
1 cup cooked polenta
3/4 cup remoulade
1/3 cup breadcrumbs
2 tablespoons(ish) chopped chives*
1/2 teaspoon paprika
salt and pepper to taste

first, heat your oven to 350 and line a baking sheet with parchment.

mash the chickpeas in a large bowl then add the cooked polenta and mash/mix it all together (hands accomplish this quickly and easily if you feel like getting messy). add the remoulade and mix and then add the rest of the ingredients and mix until well incorporated.

form your mixture into 8 patties and brush both sides with olive oil. bake for 15 minutes, or until browned. flip and cook another 15 minutes until the other side is browned. serve and enjoy!

*our first garden harvest of the year! i like to think they were better than the ones at the grocery store.

-d

Wednesday, August 17, 2011

broccoli, olive and cashew ricotta bruschetta


i tend to accumulate stacks and stacks of cooking magazines. i save them for years with the reasoning that they are filled with yummy recipes and ideas that i want to try out. that is true, they are. but the truth is i never ever go back and find those recipes that grabbed my attention when i first flipped through the issue. nope, if i don't make it within a month or two it gets lost in magazine archive land. well here's where the one not-horrible part about moving comes in. whenever we move kris convinces me that moving these piles of magazines is a waste of space (and a waste of my precious arm muscles). not ready to totally get rid of them all, i go through each issue and cut out the recipes i want to save and put them together in a binder. i actually love doing this because it gets me all excited again and in the end i have a refreshed memory of forgotten recipes as well as nice neat collection of only things that sound good to me and i don't have to flip through pages of yuck. plus it makes me feel crafty. hooray!

all of this brings us to this lovely bruschetta from way back in october 2010. we had them for dinner and loved them. they make me want to have a cocktail party so i can make them again for a crowd. they were nearly perfect - crunchy bread, creamy ricotta, garlicky greens and salty olives. delicious! only thing i would change (especially for a party) is the part where it says to sprinkle minced garlic on the toasted bread before adding the rest of the stuff. i lovelove garlic but it was a wee bit strong. next time i will just skip that part or, even better, roast a head of garlic and spread a clove on each piece of bread. that would be fantastic i think! for the ricotta i made cashew ricotta from veganomicon (the recipe is floating around the internets...).

bruschetta with kalamata olives, braised greens and cashew ricotta
(from bon appetit, october 2010)
ingredients:
10 ounces broccoli rabe, coarsely chopped
4 tablespoons olive oil, divided
3 garlic cloves, minced (plus some roasted as i mentioned above, if you want to)
crushed red pepper, to taste
12 baguette slices (or more...i made 12 and had stuff left over)
about 1 cup cashew ricotta
1 tablespoon fresh oregano leaves
25 kalamata olives, pitted and halved

cook broccoli rabe in boiling salted water until tender, 5 to 6 minutes. drain well. heat 2 tablespoons olive oil in a large skillet over medium heat. add garlic and stir for a minute. add broccoli rabe and red pepper flakes (to taste), sprinkle with salt. cook two more minutes and cool.

preheat oven to 375. place baguette slices on rimmed baking sheet and drizzle with 2 tablespoons olive oil. bake until golden, about 10 minutes. flip then bake until golden again, about 10 more minutes. spread baked bread with roasted garlic if you have it.

sprinkle bread lightly with salt. spread ricotta then top with broccoli rabe, a sprinkle or oregano and a few olives.

-d

Monday, July 25, 2011

peach and pecan upside down cake


nope i'm not dead, the yumcoast isn't dead, we've just been busy.

upon arriving in atlanta just a few weeks ago kris and i have had lots of family/friend hang out time, we've unpacked, slowly acquired furniture and and we also got this little guy, alfonzo! he's been a bit of a distraction. just look at him!

but now that the kitchen* is fully unpacked i'm ready to get back to business. i've missed cooking a lot and i've missed yumcoasting a lot. i've got weird work hours now which means kris is making most of our week night meals (what a sweetie) so i'll be taking advantage of the weekends (and any work at home days i can get!) to cook up a storm for weekend meals and weeknight prep.

sunday night we had our first dinner guests. since my mom and stuart played such a huge part in us getting this house we wanted to have them over pronto to thank them the best way we know how...with delicious food. i made this cake for dessert, with the peaches and pecans it was a fitting first sweet to make in our new home state. the cake is almost banana bread-ish (yum!) which paired really nicely with the crunchy pecans and sweet (white) peaches.


also, please forgive the photos. our new place isn't nearly as bright as our last. plus having a puppy running around while trying to photograph a piece of cake on a low table makes things interesting.

peach and pecan upside down cake
(veganized from bon appetit, august 2009)
ingredients for peach and pecan topping:
1/4 cup margarine
1/2 cup (packed) light brown sugar
pecan halves (about 40)
2 medium peaches, peeled, halved, pitted and cut into wedges
ingredients for cake:
1 1/2 cups all purpose flour
1/2 cup pecans
1 teaspoon baking powder
3/4 teaspoon ground nutmeg
1/2 teaspoon ground cinnamon
1 cup sugar
1/2 cup margarine
2 tablespoons cornstarch mixed with 6 tablespoons water
2 teaspoons vanilla extract
1/2 cup almond milk

peach and pecan topping:

melt margarine in medium saucepan over medium heat. add brown sugar; whisk until sugar dissolves, about 1 minute. pour mixture into 9-inch-diameter cake pan with 2-inch-high sides; spread evenly over bottom of pan (layer will be thin). arrange pecan halves, side by side with round sides down, in circle around outer edge of pan bottom. arrange peach wedges, slightly overlapping, inside circle of pecans, covering pan bottom. set aside while making cake batter.

cake:
position rack in center of oven; preheat to 350°F. combine first 6 ingredients in processor. blend until nuts are finely ground. beat sugar and margarine in large bowl until pale in color, about 4 minutes. whisk cornstarch mixture and vanilla in small bowl until well blended and add to margarine mixture, 1 tablespoon at a time, beating until well blended after each addition. add flour mixture in 3 additions alternately with milk in 2 additions, beating just until blended after each addition. drop batter by large spoonfuls atop pecans and peaches in pan; spread evenly and gently with spatula.

bake cake until golden brown and tester inserted into center comes out clean, about 55 minutes. transfer cake to rack; cool in pan 25 to 30 minutes (do not cool longer or peach layer may stick to pan). run small knife around sides of cake to loosen. place serving platter atop cake pan. using oven mitts, firmly hold cake pan and platter together and invert cake onto platter. let cake rest 1 minute, then very slowly lift off pan. if necessary, rearrange any peach wedges or pecans that may have become dislodged (my peaches came out perfectly! my pecans? not so much...). let cool to room temperature.

*oh you mean the kitchen that is bigger than our old living room? where two people can cook at the same time and have guests hang out? mmhmm.

-d

Thursday, June 9, 2011

fried rice and the weeks ahead...


last weekend kris and i were super productive and got a bunch of stuff packed up....including nearly everything in the kitchen. between the slim pickin's in our cabinets and our busy busy last weeks in san francisco i don't think i'm going to be doing much cooking. i haven't been posting much lately (as you can tell...) and sadly i think it's going to be pretty quiet from my end until we unpack all of our kitchen goodies on the other end. the good news is that i'm sure by that time i will be itching to start cranking stuff out!

but! in all of our packing we did not have a box big enough for the wok so we used it sunday night, along with the bag of sushi rice in the fridge, to whip up some fried rice (see, this isn't a total cop out post). we went to the japanese grocery store for ingredients and i found these tofu strips that i was really excited to try.

i thought they would do double duty as 1. tofu, and 2. a textural substitute for the eggs that are usually in fried rice. and guess what, i was right!

we also got some shishito peppers which added a nice flavor but not a lot of heat.

then it was just lots of garlic, onion and ginger in the wok, then the peppers, tofu then rice and seasoned with sesame oil, soy sauce, chili flakes, dried thai basil and blanched broccoli and snow peas tossed in at the end. oh and garnished with peanuts. delish!


-d

Wednesday, May 18, 2011

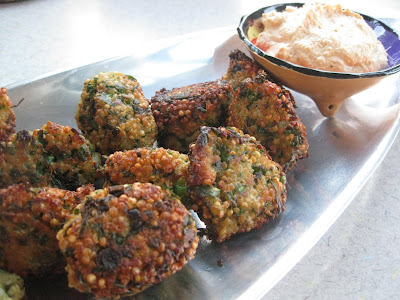
quinoa fritters


these are amazing. so amazing that i want to eat them every day. and easy enough that i probably could. if you watch top chef masters you might recognize these as half of mary sue's winning dish from the fast food challenge a couple of weeks ago. after watching eight? ten? seasons of top chef this is the first time i've ever made one of the recipes. sure, i've seen things on the show that i've thought about making before but then i go look at the recipe and it's too many steps/too many funky ingredients/too not do at home-y (i'm looking at you hector's tofu ceviche). but this was different! so simple there was no excuse not to make them.

i changed the recipe a bit to make it vegan and they turned out so well i have a hard time believing that the original version is any better. seriously. the first thing that makes these awesome is a little step that i alway mean to do when making quinoa but always forget...toasting it! yep, toss the quinoa around in a dry pan over high heat for a few minutes until it smells toasty and then cook as usual, it brings out a fantastic nuttiness in the quinoa that you don't want to miss out on.

the second thing that makes these awesome is that, despite being fried they are not greasy at all. we all know about quinoa's super health properties but i'm wondering if it also has an oil repelling quality because seriously, it's like they soaked up none of the cooking oil.

and the third thing that makes these awesome is crunchy on the outside soft and moist on the inside. perfection.

mary sue served hers with some kind of mayo something or other, i made a batch of aleppo aioli to accompany mine. mary sue served these as a side with quesadilla's, i went with the yuca tortillas from veganomicon. i did not want this dinner to end.

quinoa fritters

ingredients:
2/3 cup quinoa
1 1/3 cups water
2 tablespoons all-purpose flour
1/4 cup nutritional yeast
3/4 teaspoon salt
black pepper, to taste
4 green onions, finely chopped
1/2 bunch italian parsley, chopped
1 tablespoon cornstarch mixed with 3 tablespoons water
spoonful of tahini
oil for frying

place a dry pan over high heat. add quinoa and toast for about 5 minutes, shaking and stirring constantly to prevent scorching. transfer to a pot and add water. bring to a boil, reduce to a simmer and cook, covered, until water is absorbed, about 10 minutes. set aside to cool.in a large bowl, combine cooked quinoa, flour, nutritional yeast, and salt. add onions, parsley, tahini and cornstarch mixture. stir thoroughly with a spoon until the mixture holds together.

heat oil in a large skillet over medium heat. form the quinoa mixture into fritters and add to the oil. fry until the bottoms are golden and brown. turn and fry the second side until golden. drain on paper towels and serve warm.

-d

Friday, May 13, 2011

balsamic basil glazed tempeh


last night's dinner was inspired by the need to make a dent in all those things in our cabinets. as i mentioned before, we're moving! to atlanta! in 7 weeks (not that i'm keeping track or anything)! and while i always try to be mindful of ingredients we already have and using them rather than buying bottles of new things it has now come to the point where it's more than that...it's no longer a little thought i keep in the back of my head, it's a challenge! and though i think it might be physically impossible to use up all of the oils and vinegars and beans and grains and god knows what else in the time we have left i'm going to do the best i can!

this moving business also means that we've been keeping very busy lately. gotta take advantage of our last weeks living out west which means lots of going out and weekend trips. and then there's the work that comes with moving plus regular work and certain nights require an easy, no fuss dinner. often on those nights i turn to my most favorite tempeh recipe, orange glazed tempeh from 101cookbooks. but this night i went a different route, with a different orange glazed tempeh in order to get that bottle of balsamic 1/4 cup closer to empty. and do something with the dried thai basil that has been neglected for so long. i found a recipe online a tweaked it a bit and decided to have an orange glazed tempeh showdown of sorts! so who won? the perfection that is 101cookbooks, duh. but that was to be expected, i mean, there's nothing to do to that recipe that would make it any better.

i would even say that the recipe i made is a different thing altogether. the balsamic and basil overpowered the orange so much that i wouldn't exactly call it orange glazed. it's balsamic basil tempeh, y'all!* and if it were to compete in that category i think it could be a contender. so, here i give you not-orange-glazed tempeh.

balsamic basil glazed tempeh

ingredients:

juice from 2 oranges (about 3/4 cup)
1/4 cup balsamic vinegar
1 tablespoon olive oil
1/2 teaspoon soy sauce
2 cloves fresh garlic, crushed
1/2 tablespoon dried thai basil
1 pack tempeh, sliced

place all ingredients (except tempeh) in a pan and heat. when it starts to boil add the tempeh slices and cook until the liquid has turned into a nice glaze, flipping the tempeh periodically.

*see, there are many ways in which to prepare my return to my southern roots.

-d

Monday, April 25, 2011

roasted artichokes with aleppo aioli


despite living in san francisco for nearly four years now and despite everyone telling us that it's beautiful and wonderful and a must visit and despite the fact that it's perfect weekend-getaway distance kris and i only just went to big sur for the first time this past weekend. maybe the push was that we only have two more months here before our move (to atlanta...yep) or maybe it's that we are, for the first time ever, car owners (super weird) but i'm so glad we made it down there. everyone, you were right, big sur is pretty great. we hiked, we cooked over a campfire, drank wine from a box and relaxed along the bank of the big sur river. it was lovely.

when you drive between san francisco and big sur you get to drive through artichoke land! no, i don't recall exactly what town it's in but you will know you're there when you start passing all of the artichoke fields and produce stands. make sure you stop!


in the past i've always hated cooking artichokes...getting to the heart just seems like so much work for not a lot food. but at 10 for $1 i was willing to give it another shot. plus i told myself that baby artichokes are less intimidating. and also i've been dying to recreate the roasted artichokes with aleppo aioli that we had at pause awhile back. thus, we picked out 20 adorable artichoke babies.
and ya know what? it really wasn't so bad! those baby artichokes are a lot less work than the big guys! and i'd say that by the time i got to number 8 i was on a roll and cruising through those puppies. though i certainly wouldn't think i have any useful insight on the matter...if you're looking for a quick, "proper" way to get to the heart of a 'choke i'm sure there are countless internet people who can help you out way better than me. i'm here to tell you about the aleppo aioli! it's cashew based, has five ingredients, is delicious and it's pink. could you ask for more?

aleppo aioli

ingredients:
1 cup cashews, soaked in water for about an hour*
1/4 cup lemon juice
1/4 cup water (or enough to reach desired consistency)
1 1/2 tablespoons aleppo pepper flakes
pinch of salt to taste

couldn't be easier, place all of your ingredients in a blender or food processor and blend away until nice and creamy and combined. i would recommend adding the pepper gradually to reach your desired spicyness. same with the water, you might need a little more or less.

smear on a plate and plop artichokes on top.

you'll probably have some aioli leftbover to do something else with too. today i spread it on tempeh, coated it with panko and pan fried for some of the crispiest tempeh nuggets i've ever made. highly recommended.

*if you don't have time to soak the cashews no biggie, it just makes them blend up a little easier and a little creamier.

-d

Sunday, April 10, 2011

yeasted coffee cake


when i saw this picture of a yeasted coffee cake on friday i pretty much knew immediately what my sunday baking project would be. i've made, and loved, traditional coffee cakes but never thought to go the yeasted route. thank you vegansaurus for posting that picture because i can say for certain that this is a treat i will turn to again and again. imagine a coffee cake filling swirled within a light sweet bread dough...it's like if coffee cake and cinnamon rolls had a baby. the best part is that there are no super long rise times so you can easily make and eat this in a day, the dough is easy to work with and when it's baking it will make your entire home smell delicious (at least if your entire home is a teeny lil apartment). it's best the day of or day after baking but even after that you can heat it up a bit and it's still quite delicious. i loved the nutty date filling that i made but i also look forward to trying out some variations. you could make a glaze to drizzle over the top as well but i think it's pretty much perfect as is.

yeasted coffee cake
(makes one ring cake)
ingredients for the dough:
2 cups flour
1 1/2 tablespoons sugar
1/4 teaspoon salt
1 1/4 teaspoon yeast
1/3 cup almond milk, with a splash of apple cider vinegar to curdle
1 ounce water (any temperature)
1/4 cup margarine, room temperature
1 container (6 ounces) plain soy yogurt

ingredients for the filling:
1 tablespoon margarine
2 cups pecans, chopped
5 dates, chopped
3/4 teaspoon cinnamon
1/8 teaspoon nutmeg

first, make your dough. combine 3/4 cup of the flour with the sugar, salt and yeast.
in a saucepan, combine almond milk, water and margarine and heat until warm and the margarine is just melted.

on low speed, add the milk/margarine mixture to the dry ingredients and mix until well blended. increase speed to medium and add the yogurt and 1/2 cup more of flour and beat for 2 minutes. stir in enough of the remaining 3/4 cup of flour (or more if needed) so dough holds together. knead for 8-10 minutes until the dough is smooth and elastic.

place in a lightly greased bowl, turning to coat. cover with plastic and let rise for about an hour, until doubled in size.

meanwhile, make your filling by mixing all the ingredients (except the margarine) together.

once your dough has risen roll it out into a rectangle that is about 9x17 (that is the very precise measurement i came up with by comparing my rectangle to my baking sheet). cut off small bits of 1 tablespoons of margarine and spread them around on the dough then sprinkle with your filling evenly covering the dough, leaving a small border around the edges.

starting at the long edge carefully roll your dough into a log and pinch the seam closed. then shape it into a ring and pinch that seam closed. using scissors or a nice sharp knife cut slits all around the ring. place on a parchment/silpat lined baking sheet and cover with plastic wrap. let rise for another hour.

when your dough is almost done rising heat your oven to 350. brush the top of the loaf with almond milk and bake for about 30 minutes, until golden brown.


-d

Sunday, April 3, 2011

wild mushroom ragout


sometimes recipes come from unlikely places. like birthday cards. little did my dad know when he sent this that it was really two gifts in one...the fabulous gift inside as well as a hidden treat in this delicious recipe on the inside cover. this is way more delicious than what you would expect to find inside a card that looks like it was made in the '70s (though the back credits tell me that it is in fact from 1995). no matter! i whipped this up for a week night meal serving it on crusty bread (as the picture shows) and accompanied by a simple salad. i changed the directions a bit as my mushrooms seemed to be unusually slow to release liquid and didn't seem to have that much to release anyway. the point is that with a few less steps i still got a wonderfully buttery, thick glaze covering the mushrooms. oh also, they suggest 1 pound of oyster mushrooms and an additional pound of mixed mushrooms. well oysters are expensive so i say do as i did and mix the two pounds however you want, it's still going to be delicious.

between the two of us this was a lot of food and we had lots of mushrooms left over. we used them the next day as part of a yummy quinoa bowl.

ragout of wild mushrooms
ingredients:
2 pounds mixed mushrooms (oyster, shiitake, chanterells, portobello, crimini...whatever you want!)
4 tablespoons margarine
2 tablespoons shallots
1 1 /2 tablespoons all purpose flour
1/2 teaspoon salt
pinch black pepper
1/2 cup dry white wine
2 tablespoons minced fresh parsley

clean the mushrooms and cut into chunks.

in a heavy bottomed skillet over medium heat, melt the margarine. add the shallots and saute until translucent, 3 or 4 minutes. reduce the heat to low and add the mushrooms. cook, stirring often, until they begin to release their juices and create the beginning of a broth (5 to 10 minutes). raise the heat to medium and sprinkle the flour, salt and pepper over the mushrooms, then stir to evenly coat. add the wine and stir 3 to 4 minutes. by now the mushrooms will have reduced in volume by about one half. keep stirring until you have a nice thick brothy glaze covering all the mushrooms. sprinkle with parsley and serve over crusty bread.

-d

Thursday, March 24, 2011

olive oil rosemary cake with glace apricots


birthday time for me means lots of edible gifts. mamoo seems to know the best spots for ordering everything so i was really excited when a box arrived full of dried fruit...i knew it would be good stuff. true to her word the dates make your eyes roll back in your head (that's a good thing, guys!), the figs taste like fig newton filling and the glace apricots are maybe a bit sweet to gobble on their own but absolutely perfect to incorporate as part of another dish. in this case, cake!

since the apricots bring a lot of sweetness on their own i wanted to make sure the cake wasn't too sweet which got me thinking about an olive oil cake. then i was thinking about what herbs might be yummy in the mix and rosemary came to mind, i love love love the combination in apple rosemary scones so why not with apricots, right? right!

i found a basic recipe online and tweaked from there. as we all know tweaking baking recipes is much more difficult than tweaking cooking recipes and the resulting cake was a bit denser than i had in mind but i loved the flavor. go into this thinking not of a light and airy desserty cake but rather more of a dessert cakey bread and i think you will be pleased with what you get. rather than cutting up the apricots and hiding them in the batter i wanted them to be the focus so i plopped them right on top of the batter before baking. when the cake came out of the oven they were a bit gooey and ooooooooooh yummy.

olive oil rosemary cake with glace apricots
ingredients:
3 cups flour
3 tablespoons fresh, minced rosemary
2 teaspoons baking powder
1/2 teaspoon baking soda
1/2 teaspoon salt
1/2 cup sugar
3/4 cup olive oil
1 1/4 cups almond milk
glace apricots to top

preheat oven to 350 and lightly grease a cake pan - i used and 8-inch (i think) springform.

mix together the dry ingredients. add olive oil and milk and mix until the ingredients are all wet.* the batter will be very thick, don't fret just go with it.

pour batter into your prepared pan and top with glace apricots.

bake 50-55 minutes or until done.

*after i did this i realized it felt backwards for a cake. doing this again i would mix together the wet ingredients then gradually add the dry ones. either way, take your pick.

-d

Tuesday, March 22, 2011

chocolate covered pretzels


long ago in our boston days, kris and i loved the chocolate covered pretzels from the faneuil hall food court. they were a special treat and any time we found ourselves in the area those pretzels made up for having to deal with the annoying crowds of tourists. we still pick up a chocolate covered pretzel here and there but kris has been asking me to make them forever and i...just never did. until recently. and now i feel like such a meanie for not doing this sooner because, duh!, it's the easiest treat to make ever. and it makes my kris so happy.
all you need is a box of pretzels (i recommend fat ones. i used snyder's brand), a bag of chocolate chips (semi-sweet here) and something to thin the chocolate out a bit (i used a bit of margarine and some splashes of almond milk). melt the chocolate chips over a double boiler and add margarine/milk to thin as needed. when you have a nice dip-able consistency start dunking! place chocolatey pretzels on a baking sheet and put in the fridge for a few hours until the chocolate is nice and hardened. you might have more chocolate than pretzels and that's ok! just peek around your fridge/pantry for items in need of chocolate coating. i found dried apricots.


-d

Saturday, March 19, 2011

picture time!

these are two dinners that i made recently. no recipes in this post as they were both random, throw-em-together kind of dishes but both were really tasty and maybe they'll inspire your own dinner creations.

first was a noodle bowl. soba noodles in a miso broth with lots of toppings! shiitakes, tofu, slices of gigantic green onions, nori and black sesame seeds. not only was this warming and filling but we got to use our supercute noodle bowls. double success!

this next one was cooked up on st. patrick's day. i didn't go out but instead stayed home and made a dinner heavy on the green ingredients. i tossed some brown rice with pesto then topped it with roasted parsnips, blanched broccoli and avocado (i'll take any excuse to add avocado to a meal).

-d

Wednesday, March 16, 2011

coconut balls


for book club our most recent read was super sad true love story by gary shteyngart. now i don't know about other book clubs but ours is as much about the food that everyone brings as much as it is about the books we read. for each book we choose a food relevant theme and since one theme in this book was trying to live forever it only seemed appropriate that we all bring our most healthy creations. i feel that dessert is always important so i set upon making a healthy sweet. i remembered getting an email from the vegnews recipe club awhile back for these dried fruit coconut balls and figured now would be a perfect time* to give them a shot. sometimes when i get home from work i have trouble getting a dish together in time for book club but these are super quick and easy. everyone seemed to enjoy them and two comments i remember are that they 1. taste like christmas and 2. taste like a lara bar...but better (of course). so that gives you a little idea of what you're getting.

i stuck to the recipe except that i used dried cranberries instead of raisins because i don't like raisins much and while i'm sure they're fine all mixed up with the others in here the store didn't have any in the bulk bins and i surely was not about to buy a big bag of those suckers. speaking of the bulk bins, if you buy all of this stuff in bulk it's pretty cheap to get all the ingredients.

coconut balls
ingredients:
3/4 cup dried cranberries
3/4 cup raw walnuts
3/4 cup dates, pitted
3/4 cup dried apricots
3/4 cup unsweetened shredded coconut
2 tablespoons orange juice
zest of 1 orange
shredded coconut, for coating

in a food processor, pulverize cranberries, walnuts, dates and apricots for 1 to 2 minutes until finely chopped (or mere seconds if you have a brand new food processor!!!) add coconut, orange juice and zest. process for an additional 1 to 2 minutes or until mixture comes together to form a ball.

place some coconut on a plate. dampen hands with water, form mixture into one inch balls and roll in shredded coconut.

eat away!

i've been storing the leftovers in the fridge and they're pretty tasty cold as well. and they firm up a bit too if you keep them in there.

-d

*not only because they fit the theme but also because kris got me a big food processor(!) for my birthday and i am in love (with it and also with him).

Sunday, March 13, 2011

pasta with chickpeas and charred tomatoes


or as i like to call it, hummus pasta. it's been awhile since i've made a recipe from bon appetit and this dish was a nice welcome back. when i glanced at the recipe i thought it looked like a perfect weeknight meal, as easy as normal old spaghetti but something different from our go-to red sauce. upon eating the first bite i thought, "why didn't i think to use hummus as pasta sauce before? it's genius!" i will definitely be making this again...it's got smokiness from the paprika, juicy bursts from the charred tomatoes, saltiness from the olives, fresh herbiness from the cilantro plus whole chickpeas for an extra dose of garbanzo goodness. i also think this would be a fun recipe to play around with. as i type kris is in the kitchen whipping up a batch of his amazing sun dried tomato hummus....i think that would be fantastic in here, maybe with basil instead of cilantro for a more "traditional" italian pasta.

pasta with chickpeas and charred tomatoes
(from bon appetit, february 2011)
ingredients:
8 ounces pasta
1/2 cup hummus (they say plain but i think playing with flavors would only make things better)
2 tablespoons olive oil
1 box grape tomatoes
1 15 oz. can chickpeas, drained
3 garlic cloves, pressed
1 teaspoon smoked paprika
1/2 cup halved pitted kalamata olives
1/2 cup chopped fresh cilantro

cook pasta according to package instructions until tender but still firm to bite. drain, reserving 1/2 cup cooking liquid. whisk hummus into liquid.

meanwhile, heat oil in a large skillet over high heat. add tomatoes; sprinkle with salt and pepper. cook until blackened in spots, shaking skillet occasionally, about 8 minutes. mix in chickpeas, garlic and smoked paprika. crush some of the tomatoes to release juices. add pasta and enough hummus mixture to coat. mix in olives and cilantro, season with salt and pepper.

-d

as a side note, i am so happy that we sprang forward today. no more poorly lit dinner pictures, hooray!

Tuesday, March 1, 2011

rye bread: a near disaster


sometime fails turn into gigantic successes and it's oh so delightful when they do.
sunday i made rye bread, planning to use it for tempeh reubans for dinner. actually, to back up a bit, i started the bread at about midnight on saturday night so it could rise overnight easy bread style. smart, right? earlier in the evening we spent some time getting to know the menu at smuggler's cove. then we went to get dinner and had some wine. then we went to a show where i started to get very tired. then we walked home and that's when i whipped up the bread dough. still smart? not so sure. either my yeast has gone bad or my measurements were very very off because when this bread came out of the oven it felt like it had a brick inside.

needless to say we bought a loaf of bread for our sandwiches, but we pondered what to do with the rye brick. not sure it was even worthy of turning into croutons, kris and i decided to have a taste and decide it's fate. holy goodness! dense, yes...but also bursting with absolutely delicious rye flavor! it deserved to be more than croutons, more than breadcrumbs, and luckily i have a smart husband who came up with the idea to use it as a base for "eggs" florentine, or benedict...whatever the one with spinach is.

we used a couple of components from vegan brunch - hollandaise sauce and then the omelet recipe for the egg. we heated up the bread and as it got soaked with the hollandaise it was just perfect. this was one super delicious dinner!

-d

Wednesday, February 16, 2011

'moo's wild rice


a couple of months ago, for hanukkah, my mamoo sent me a kris a bag of moose lake wild rice. we were super excited because, duh!, wild rice is good stuff!!! last night we decided to bust it open with this lovely little concoction. it's a simple assembly of (our star of the evening) wild rice, roasted vegetables and tempeh all drizzled with a tasty little sauce. it's one of those simply yummy things that you can take in many directions to use up whatever you have that needs using. i love those kinds of dinners.

back over christmas (yes, this is turning into a belated holiday post apparently) we took a trip to jungle jim's in cincinnati which is a gigantic supermarket with an overwhelmingly large international section. since we were flying home we tried to limit ourselves to purchases that were small, light, cheap and not of the liquid or gel variety. spices fit the bill nicely so this sauce took advantage of (annoying ingredient alert!) lemongrass powder. if you don't have any i'm sure using fresh would be even better.

mamoo's wild rice concoction

ingredients, what to do and such:
first cook your wild rice according to package instructions.

toss brussels sprouts, cauliflower and a handful of whole peeled garlic cloves with a little oil and salt and pepper. roast at 350 until nice and...roasty.

while the vegetables are roasting pan fry tempeh chunks in a bit of oil. when they start to brown add some balsamic vinaigrette (because that's what's almost done in the fridge) and cook a few minutes longer.

now for the sauce! whisk all of these things together:
juice of one orange (about 1/2 cup)
1 tablespoon minced ginger
1 tablespoon soy sauce
1 teaspoon mirin
2 teaspoons rice vinegar
1 1/2 teaspoons lemongrass powder
1/4 teaspoon sesame oil
chili flakes to taste

to assemble, put the rice in a bowl and drizzle with sauce. top with tempeh and vegetables and drizzle with more sauce. you're done!

-d

on another note, kris and i leaving for a long weekend in kauai tomorrow! i hope to return with lots of foodish things to share.

Friday, February 11, 2011

Chocolate Tart


A few weeks ago, I hosted a little impromptu dinner party with a friend. The inspiration was Julia Child – one of our shared idols – and so something French was in order. The plan was a quiet evening, making a very “French Chef” dinner, followed by a viewing of Julie/Julia. We settled on coq au vin – a true classic, and perfect for winter entertaining. I searched around for something decadent yet simple for dessert, and found the following recipe. It comes from Alice Waters, and was really a breeze to make. I was a bit suspicious of the Pâte Sucrée at first; it mixed up like a cookie dough – creaming the butter and sugar together, then adding wet and dry ingredients. And it was very sticky.


But I went with it, and in the end was rewarded with a short, buttery crust – the perfect foil for a rich, creamy ganache filling. (Make sure to splurge on a good chocolate here). The tart takes a bit of time to set up, so make it before your guests arrive, and they can oooh and ahhh over it while you’re making dinner. And it’s perfect for times when dinner for two turns into dinner for seven, because just a little slice is enough!


We ended up serving it with whipped cream (with a hint of rum mixed in) and it was the perfect end (or beginning) to a night of good times with good friends.


Sweet Tart Dough

from Alice Waters, The Art of Simple Food

8 tablespoons (1 stick) butter, softened

1/3 cup sugar

¼ teaspoon salt

¼ teaspoon vanilla extract

1 egg yolk

1 ¼ cups all purpose unbleached flour

Beat together the butter and sugar until creamy. Add the salt, vanilla, and egg yolk, and mix until combined. Finally, add in the flour, mixing well, stirring and folding until there are no dry patches. Chill for at least 4 hours or overnight until firm. (Note: I chilled the dough for about 1 hour, and it rolled out nicely).


Chocolate Tart

from Alice Waters, The Art of Simple Food

1 disk of Sweet Tart Dough

6 ounces bittersweet chocolate, chopped

1 cup heavy cream

Preheat the oven to 350 degrees Fahrenheit. Roll the dough into a 12-inch circle. Lightly prick the dough with a fork. Line a 9-inch tart pan with the dough, lightly pressing the dough into the pan. Roll the rolling pin over the top of the tart pan to remove any excess dough. Patch any cracks with excess dough. Let the tart rest for at least 10 minutes in the freezer. Prebake the tart shell for 15 minutes, until light golden brown. Check the pastry halfway through the cooking, and pat down any bubbles that may have formed. Let cool and unmold.


For the ganache, put the chocolate in a heat-proof bowl. Heat the cream until just boiling, pour over the chocolate, and let sit for 30 seconds. Stir until the chocolate is melted, and the chocolate is smooth and glossy. Pour into the tart shell while the ganache is still quite warm and liquid, gently tapping and jiggling the shell to even out the filling. Let sit at room temperature for at least an hour to set.


(Note: use any leftover dough to make little jam thumbprint cookies. They bake at 350 degrees for about 12 minutes, and make a nice little snack!)


Enjoy!


~ e

Monday, February 7, 2011

Curried Lentil Dip

While searching for something meat-free to take to a Super Bowl party, I came across this recipe. Food52 is one of my new go-to sites for interesting recipes, and this one was no exception. This dip is simple and yet complex, with the warmth and richness of cinnamon and curry mixed with the humble lentil. Because I happened to be out of veggie stock, I threw in some sliced carrots and slivered leeks with the onion and garlic for added flavor. The carrot also provided nice little pops of color in the finished dip. I also used parsley in place of cilantro, and the dip was still delicious!

This recipe makes quite a lot of dip – 5 people put a decent dent in it, but there are still plenty of leftovers. You could also serve as an entrée when served over rice.


Curried Lentil Dip

Adapted from Food52.com

Serves 6 to 8


1 can of coconut milk

1 ½ cup dried red lentils (rinsed)

1 onion, large, minced

2 cloves garlic, minced

2 carrots, peeled and thinly sliced

2 small leeks, rinsed and sliced

saltthinly

1 tablespoon dried fresh ginger

1 tablespoon olive oil

½ teaspoon each ground cumin, turmeric, cumin, and black pepper

2 teaspoons garam masala (or other – I used Muchi) curry powder

¼ teaspoon red pepper flakes

¼ teaspoon ground cinnamon

2-3 Bay Leaves

3 tablespoons parsley (fresh), chopped

Place can of coconut milk in freezer 20 minutes before starting to cook. Open can and remove solidified coconut butter from the top to use in sautéing. Reserve the rest of the coconut milk.

In a sieve rinse lentils and drain.

In a 2-quart heavy saucepan cook onion, garlic, and a couple pinches of salt in 2 tablespoons coconut milk fat over moderate heat, stirring, until golden.

Add ginger and cook, stirring, 1 minute.

Add lentils, coconut milk, 3 cups water and gently boil, uncovered, until lentils fall apart, about 20 minutes.

While lentils are cooking, take a small heavy skillet and heat the olive oil over moderate heat until hot but not smoking and cook cumin, stirring, until a shade darker, about 30 seconds.

Add curry powder and other remaining spices and cook, stirring, until fragrant, 15 to 30 seconds. Stir hot spice oil into lentils.

Let curry stand, covered, 5 minutes to allow flavors to develop. Stir in cilantro and add salt to taste.

Serve with either Sweet Potato Chips or over rice as a side dish.


Enjoy!


~ e