Wednesday, July 29, 2009

blueberry muffins


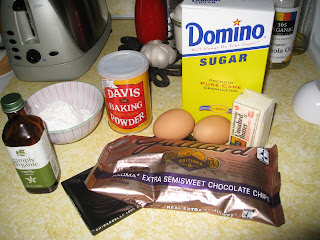
These are my very favorite blueberry muffins. As I have mentioned before, I hated blueberries as a child, and my parents made me blueberry-less blueberry muffins every summer. And even though they were super tasty, I am glad that I have found a place in my heart for blueberries.I have transcribed the recipe from the book, BUT I never actually mash any of the blueberries. They soften as they bake and form a nice blueberry swirl on their own, so I have never gone to the trouble of mashing. And this time, because I was making them for guests this weekend and ran out of all-purpose flour, substituted one cup of all purpose with one cup of white whole white. They were not quite as fluffy, but I think a tad healthier in the end!

Enjoy!

- e


Double Blueberry Muffins

from Gale Gand, Butter Flour Sugar Eggs

8 tablespoons (1 stick) unsalted butter, softened to room temperature
1 cup, plus 2 tablespoons sugar
2 eggs
1 teaspoon vanilla extract
2 teaspoons baking powder
1/4 teaspoon salt
2 1/2 cups fresh blueberries
2 cups flour
1/2 cup whole or lowfat milk
1/4 teaspoon cinnamon

Preheat the oven to 375 degrees F. Grease a muffin tin or line the cups with paper liners. In a mixer fitted with a paddle attachment (or using a hand mixer), cream the butter until smooth. Add 1 cup of the sugar and mix. Add the eggs, vanilla, baking powder, and salt and mix. In a shallow bowl, mash 3/4 cup of the blueberries with the back of a fork. Add to the batter and mix.

With the mixer running at low speed, add 1/2 of the flour, then 1/2 of the milk, and mix. Repeat with remaining flour and milk. Fold in the remaining 1 3/4 cups whole blueberries by hand until well mixed. In a separate small bowl, mix the remaining 2 tablespoons sugar with the cinnamon. Use an ice-cream scoop or large spoon to fill the muffin cups 3/4 full. Sprinkle the cinnamon-sugar over the muffins and bake until golden brown and risen, 25 to 30 minutes. Let cool in the pan at least 30 minutes before turning out.

Monday, July 27, 2009

farmers' market feast


I really love the farmers' market . . . the bounty of fresh local produce. The varieties of berries and beans that you never, ever see in the supermarket. Foraged mushrooms. One dollar strudel sticks. The friendly farmers who truly care about the product they are selling. I could go on and on, but I will spare you! Suffice to say that come summer time, I am happy to roam around outside, picking out my produce in the open air.


What follows is not so much a recipe, but a celebration of truly fresh ingredients, prepared very simply, allowing the sweetness of the tomatoes and the crispness of the haricot verts to stand out.

I bought the most beautiful, super-skinny, haricot verts and wax beans, blanched them (they were in the boiling water for all of 2 minutes before I drained them and shocked them in cold water), seasoned them with salt and pepper, and drizzled with olive oil.


I also bought this crazy purple, green and white beans, called dragon's lingerie - oh my! - and sauteed them with garlic and olive oil. Also seasoned with salt and pepper.


And I served both beans with some gorgeous and very flavorful heirloom tomatoes. The plate looked beautiful and everything was delicious!

enjoy!

- e

Friday, July 24, 2009

avocado nectarine salad with crispy shallots


this is a salad that i whipped up for lunch earlier this week. i was at the store and needed lunch and picked up these ingredients on a whim. this salad isn't earth shattering, but i do think it provides a delightful combination of flavors and textures - a little sweet, a little tart, a creamy avocado and a nice little crunch of shallots. so here you go...quick, easy, fresh and yummy!

avocado and nectarine salad with crispy shallots

ingredients:
handful baby spinach
1 avocado, sliced
1 nectarine, sliced
1 small shallot, thinly sliced
juice of 1/2 lemon
olive oil
salt and pepper

heat a splash of oil in a small pan and add the shallot with a pinch of salt. cook over medium-high heat, stirring often until the shallots are nicely brown and starting to crisp.

place spinach in a bowl. top with avocado and nectarine slices. dress with the lemon juice and a drizzle of olive oil. toss and add coarse salt and pepper to taste. top with shallots and enjoy!

-d

simply delicious


I have a little confession to make. I have been keeping something from you. Sometimes I can be a little selfish. But really, this recipe is so deliciously easy, so incredibly versatile that i can't keep it under wraps forever!

My mom has been making these brownies for as long as I can remember. I make them more often than I care to admit, but they are so easy and satisfying. And you only have to wash one pan! I usually sprinkle chocolate chips over the top before baking, but you could add nuts, dried cherries, fresh raspberries, marshmallows . . . the list goes on. You can also top them with vanilla ice cream and homemade chocolate sauce for the perfect brownie fudge sundae. Now go. Make them! Sharing is optional :)


Saucepan Brownies

1 stick unsalted butter
2 oz. unsweetened chocolate
1 cup sugar
2 eggs
1 tsp vanilla
1 tsp baking powder
1/2 cup flour

Preheat oven to 350 degrees and grease 8-inch baking pan.

Melt butter and chocolate in medium saucepan over medium heat.

Once melted, remove from heat, and add remaining ingredients in the order they are listed. Pour into prepared pan. Bake for 30 minutes. Enjoy!

- e

Tuesday, July 21, 2009

no bake chocolate peanut butter bars


My mother introduced me to these delicious and super easy bar cookies over 4th of July weekend. I was slightly skeptical at first, afraid they would be too sweet, but one bite and I was hooked. So as soon as I was back in Boston, I had to make them!

Of course, me being me, I could not leave well enough alone, and decided to make my own chocolate wafers.
To be fair, I could not for the life of me find Nabisco Classic Chocolate Wafers, and was ultimately really pleased with this chocolate wafer cookie from Smitten Kitchen. And with my extra wafers, I made delicious little ice cream sandwiches. Who wouldn't love that!

These must be kept in the fridge, which makes them the perfect summer treat! They are apparently fantastic frozen as well. And when you cut the bars up, you will inevitably have lots of little crumbles. If you can resist eating these crumbs right away, save them in the fridge to sprinkle over vanilla ice cream. Enjoy!


No-Bake Chocolate and Peanut Butter Oatmeal Bars

from Martha Stewart, August 2008

Vegetable oil cooking spray

9 ounces chocolate wafers (about 40 wafers), finely ground (2 cups)
1 1/2 cups old-fashioned oats
1 1/4 cups confectioners' sugar
1/4 teaspoon coarse salt
5 ounces (1 stick plus 2 tablespoons) unsalted butter, cut into small pieces
1 cup chunky peanut butter
3/4 cup plus 3 tablespoons smooth peanut butter
10 ounces semisweet chocolate, melted
1 1/2 ounces milk chocolate, melted

Coat a 9-by-13 inch baking pan with cooking spray. Line with parchment paper, leaving a 2-inch overhang on the 2 long sides.

Combine the ground wafers, oats, sugar, and salt in a large bowl. Melt butter in a medium saucepan over medium heat, then add the chunky peanut butter and 3/4 cup smooth peanut butter, whisking until well combined. Transfer to a baking dish, and use the bottom of a measuring cup or an offset spatula (or your fingers!) to firmly press the mixture into an even layer. Refrigerate for 30 minutes.

Pour melted semisweet chocolate over chilled mixture and, using a offset spatula, spread into a thin layer that covers the entire surface. Refrigerate until hardened, at least 15 minutes.

Heat remaining 3 tablespoons of creamy peanut butter in a small saucepan until runny. Drizzle peanut butter over chilled chocolate. Repeat with milk chocolate. Refrigerate until hardened, about 15 minutes (fyi - if you use all natural peanut butter, it lacks stabilizers, and never completely hardens).

Use parchment to lift chilled block of bars out of the pan. Run a sharp knife under hot water, dry well, and cut into 24 squares, wiping knife between cuts. Sliced bars can be refrigerated for up to 1 week, or frozen for up to 1 month.

- e

Thursday, July 16, 2009

muffin tin pies


this project has been lurking on my to-do for the past couple of weeks after i saw some girls in dolores park selling little mini pies. of course instead of buying pie from them i stole their idea and made my own. it's a little bit time consuming with the rolling and cutting and assembling, but kris was out of town last weekend so i had plenty of time to dedicate to the task. plus i wanted to have little pies to feed him when he came home from his bachelor party to show him what a good wife i can be.

i went to the farmer's market on sunday to buy fruit for the innards and everything looked so good i couldn't decide on just one filling. so i made two - strawberry rhubarb and peach nectarine with ginger. i don't think i can pick a favorite, they are both yummy! the strawberry has a little tartness from the rhubarb and the orange compliments both flavors nicely. i didn't add any sugar to the peach and nectarine filling because my peaches were already very ripe and sweet. the ginger adds a delicious little hint of spice.

to make these, start off with your favorite trusted pie crust recipe. i used the basic pastry crust from veganomicon. the recipe is for a single (12 inch i think) pie crust and i made three of them and had dough for 18 little pies.

strawberry rhubarb pie filling
(makes filling for 9 mini pies)
ingredients:
2 stalks of rhubarb, diced
1 heaping cup strawberries, sliced
2 tablespoons sugar
zest of 1/2 orange and a squeeze of juice
1 tablespoon cornstarch

gingery peach and nectarine
(makes filling for 9 mini pies)
ingredients:
2 ripe peaches, peeled and cut into small chunks
1 ripe nectarine, peeled and cut into small chunks
juice of 1/2 lemon
1/4 cup crystallized ginger, diced


once you have made your pie dough, make the fillings by mixing all the ingredients in a bowl and set aside for a few minutes.

preheat the oven to 400 and lightly grease your muffin tin.

roll out your dough and cut circles for the bottom crust and slightly smaller circles for the top crust. i used a can of pineapple and the top of a small glass...which translates to roughly 4 inches for the bottom and 3 inches for the top (who needs cookie cutters? actually, i would love some).

fit the bottom crust into the muffin tin, carefully pressing along the sides and the bottom to make sure it lays flat. fill almost to the top with filling. place the top crust over the filling and pinch along the edges to form a seal with the bottom crust. cut a little x in the top. repeat until you have filled your muffin tin.

bake for about 30 minutes or until the tops are golden brown.

if you don't plan on eating all your pies at once, they freeze really well! wrap them up nice and tight and reheat at 350 for about 20 minutes.

-d

Monday, July 13, 2009

quick chili lime tofu


a lot of times i don't plan ahead. a lot of tofu recipes assume that i do. with long marinating times and such, a flavorful batch of tofu sometimes seems so far away when all i want is a taco and now please! so for those emergency times i whipped up this little saucy creation to toss some tofu cubes in and then cook them in thus giving you a tangy, spicy and smokey fix right when you need it.

i cubed the tofu and made tacos but you could make whatever creation your heart desires. maybe cook the tofu in slabs and make a sandwich! go crazy!

quick chili lime tofu
ingredients:
8 ounces extra firm tofu, drained and cubed
2 limes, juiced
2 cloves garlic, minced
2 tablespoons adobo sauce from a can of chipotles
1 teaspoon cumin
1 teaspoon soy sauce
peanut oil, for cooking

in a medium sized bowl, combine lime juice, garlic, cumin, adobo and soy sauce (if you want a little more spice chop up one of the chipotle peppers and throw that in too). add tofu cubes and toss to coat. in a large pan, heat just enough oil to coat the bottom of the pan. add the tofu cubes and cook over medium-high heat until the cubes begin to brown. give them a toss and pour in the rest of the sauce. cook a few more minutes, stirring occasionally, until tofu is nicely browned and saucy.

-d

Thursday, July 9, 2009

pickles!


this past weekend i checked out bryant terry's vegan soul kitchen from the library. it's a cookbook that i have been eyeing and wanting to buy so i was really excited to have the chance to give it a test run. it's full of tempting, southern inspired recipes but one that caught my eye was pickles! this is a project i have been wanting to try for awhile and i'm so glad i finally did. they're awesome! they are bursting with dilly, slightly spicy flavor but, most importantly to me, they still have a nice crunch to them.

the recipe calls for kirby cucumbers, i'm not sure if that's what i used. i saw small cukes at the corner store and they were just labeled pickles but i figured as long as we were on the same page they'd do the trick. i bought three of them and they perfectly filled one peanut butter jar. the recipe calls for eighteen so unless you want a ton of pickles or are planning to pass them out to all your friends you'll probably end up doing some math to figure out the quantities to use.

also, in case you're wondering, the sandwich in the background is the open faced bbq tempeh sandwich with carrot-cayenne coleslaw (also from vegan soul kitchen) and it was delicious! so far we're two for two!


spicy dill pickles
(from vegan soul kitchen)
ingredients:
1 cup coarse sea salt
1 1/2 gallons plus 3 cups water*
18 kirby cucumbers, quartered lengthwise
3 tablespoons red pepper flakes
1 tablespoon yellow mustard seeds
1 tablespoon cumin seeds
1 tablespoon coarsely ground white pepper
3 cloves garlic, minced
1/2 cup apple cider vinegar
3 1/2 cups distilled white vinegar
2 tablespoons agave nectar (i used sugar)
2 bunches dill, minced

in a large stockpot over medium-low heat, make a brine by combining 3/4 cup of the salt with 1 1/2 gallons of water. stir well until the salt is completely dissolved. remove from heat and set aside to cool. add the cucumbers to the brine, place a small plate on top to ensure that they are completely covered in the water, and refrigerate overnight.

drain the cucumbers in a colander, rinse with cold water, and set aside.

in a small saute pan over medium heat, combine the red pepper flakes, mustard seeds, cumin seeds, and pepper and toast until fragrant, about 2 minutes. transfer to a large saucepan. stir in the garlic, vinegars, agave nectar, dill, and the remaining salt and water. simmer until the salt is dissolved, about 3 minutes. set aside to cool.

divide the cucumber evenly between jars. leaving 1/2 inch of space at the top, fill the jars with the vinegar mixture. close the jars and store in the refrigerator for at least 48 hours before eating.

*i'll save you a little bit of time. there are 16 cups in a gallon. you're welcome!

-d

Monday, July 6, 2009

pineapple empanadas


i made these fruity empanadas for a hawaiian themed fourth of july/birthday celebration picnic in dolores park. my first thought was to make pineapple cupcakes but eventually decided on empanadas for easier portability. good thing cause there were cupcakes a-plenty!

i took parts of several recipes in order to get to this one. the empanada dough is fantastic! it's really flaky and i think it would work great for any pie-ish dough needs. i think next we will try it with a savory filling sprinkled with salt and herbs.....

pineapple empanadas
(makes about 15 empanadas)
dough ingredients:
2 cups sifted flour
1 teaspoon baking powder
1/2 teaspoon salt
1/8 teaspoon ground ginger
1/2 cup shortening
1/3 (or more) cold soy milk (i needed more)
water for brushing
coarse sugar to sprinkle

filling ingredients:
1 cup crushed pineapple, in its own juice
1/4 cup sugar
1 tablespoon cornstarch
1/2 teaspoon vanilla extract

to make the dough, mix flour, baking powder, salt and ginger. cut in shortening until the mixture becomes like coarse meal. add soy milk, a few drops at a time, mixing dough until it comes together and forms a ball. flatten dough into a disk shape, wrap in plastic wrap and refrigerate 30 minutes.

to make the filling, combine all ingredients in a small saucepan. bring to a boil and stir constantly for about 30 seconds. lower the heat to low and stir for another minute.

line a baking sheet with parchment and heat the oven to 450.

roll dough into a thin sheet on a floured surface. use a cookie cutter/beer mug/what-have-you to cut out 4 inch circles. place a teaspoonful of filling on the center of each circle. brush edges of circle with water and fold in half. carefully press the edges together and seal them together with fork tines. place on prepared baking sheet. brush the tops with water and sprinkle with coarse sugar.

bake until golden brown, about 15 minutes. cool on wire racks.

-d

Sunday, July 5, 2009

broccoli pesto


we had a broccoli crown in the fridge that was nearing the point of use-now-or-else. wanting to do something other than the usual steamed/blanched/sauteed/other-easy-cooking-method broccoli side dish, i decided to make a broccoli pesto of sorts to shake things up. i used nuts and herbs that we already had on hand and you could easily switch them out for whatever you have laying around. we enjoyed this on pasta for dinner but it would work well wherever you would normally use pesto!


broccoli pesto
ingredients:
1 broccoli crown
1/4 cup almonds
3/4 cup dill, coarsely chopped
3/4 cup parsley, coarsely chopped
juice of 1 1/2 lemons
5 cloves braised garlic*
1/4 teaspoon crushed chili flakes
1/2 cup olive oil (give or take)
salt and pepper to taste

chop the broccoli into small florets and slice the stem. blanch in a pot of salted boiling water for about 15 seconds. drain in a colander and run under cold water.

in a food processor, pulse the almonds until they become fine crumbs (but don't turn them into butter!). add the broccoli and give it a few spins to roughly chop it up. add all other ingredients and process until you reach your desired pesto consistency. i poured in a splash of oil in the beginning forgetting to measure, then measured out an additional 1/4 cup to add but i think i had about 1/2 cup total. anyway, add the oil gradually and blend in between to make sure you don't use too much.

i didn't have room in our tiny food processor for all the broccoli so i saved the stem slices and browned them in a frying pan to top our pasta with.

*braised garlic is super easy to make and a nice thing to keep in the fridge. to make it, just separate and peel the garlic cloves from two heads of garlic (or however many you want) and place in a small baking dish. cover with 1/2 cup olive oil and toss in a rosemary sprig (or whatever herbs you want). cover with foil and cook at 350 for about 30-40 minutes (until the cloves are light brown and soft).

-d

Friday, July 3, 2009

strawberry apricot jam


I have no idea what came over me, but the other day I got home from an afternoon of hanging out with a friend and felt the need to make jam. Maybe it was the dreary weather, or the multiple quarts of fresh strawberries lurking in my kitchen (I eat as many in-season strawberries as is humanly possible to make up for all the tasteless ones I consume throughout the rest of the year). So I made jam.

Now, as a child, I helped my mother make dozens of jars of strawberry jam, after intensive strawberry-picking sessions. We would come home with flats and flats of berries, and since four people could not possibly eat that many pounds of berries, my mom made jam. Lots of it. And stored it in the freezer. It was bright red and sweet and delicious and is still my favorite jam of all time. And this jam, the one I made the other day, comes pretty close to the flavor of that jam.

I worked from a Barefoot Contessa recipe and adapted liberally. The apple adds natural pectin, the goo that holds jam together and gives it that nice glossiness. I threw in the apricot for a bit of tang to off-set the strawberry sweetness. And it's delicious. I might start eating it straight from the jar with a spoon. And am now scheming up a few dessert ideas to use it in, so stay tuned!

Strawberry Apricot Jam
adapted from Barefoot Contessa: Back to Basics
make 3 cups

3 pints fresh strawberries
3 ripe apricots
3 cups superfine sugar (I used plain old granulated and it was just fine)
1/2 Granny Smith apple, peeled, cored, and finely diced
zest and juice of 1 orange

Rinse the strawberries. Drain and hull. Cut the larger ones in quarters, smaller ones in halves. Cut the apricots in half, remove pit, and cut into half-inch or so chunks. Place berries and apricots in a deep, heavy-bottomed pot and toss with sugar. Let macerate for 10 minutes or so.

Bring the berry mixture to a boil over medium heat, stirring often. Add the apple, orange zest and juice, and continue to keep the mixture at a rolling boil, stirring occasionally, until the jam reaches 220 degrees on a candy thermometer. This should take 25 to 35 minutes. Skim and discard any foam that rises to the top.

Allow mixture to cool to room temperature, then store covered in the refrigerator. The jam will keep at least 2 weeks. If you would like it to last a bit longer, pack and seal in canning jars according to the manufacturers instructions.

Enjoy!

- e

Thursday, July 2, 2009

grilled guacamole


With the Fourth of July this weekend, let's take a moment to appreciate the avocado, the favorite fruit of us yumcoasters.


I made this grilled guac for a little impromptu dinner party a few weekends ago. It was inspired by this post from Darcy, and a subsequent (and possibly alcohol-fueled) conversation in Chicago regarding the myriad possibilities of the the grilled avocado. Once back in Boston, I decided to make it on yet another deary Saturday and have a few friends over for burritos and, of course, s'mores!


Here is the, sort of, recipe. You can adjust the seasonings and heat to your liking!

Grilled Guacamole

4 avocados, halved and pits removed
3 small plum tomatoes
1/2 jalepeno pepper, finely diced
2 tbsp (or so) finely chopped red onion
2 tbsp (again, or so) chopped fresh cilantro
Juice of a lime (or two)
Salt and pepper

Heat a grill pan (or an outdoor grill). Drizzle the avocado halves with olive oil and sprinkle with salt. Place cut face down on hot grill pan. After 3 to 5 minutes, rotate 90 degrees (so you have nicely hatched grill marks). Grill for another 3 minutes or so, remove from pan and let cool slightly. Remove avocado flesh from skin and coarsely chop. Combine in a large bowl with all other ingredients. Stir to combine, lightly mashing the avocado (you want the finished product fairly chunky. None of this pureed guacmole). Season liberally with salt and pepper, and serve with your favorite tortilla chips!

Enjoy!

- e

Wednesday, July 1, 2009

pina colada popsicles


the june issue of gourmet is certainly not lacking in mouth watering recipes and inspiration. however, it was on the very last page, a page of boozy popsicles, that i found the one i had to make first. sometimes these things are too simple to put off and when the sun is shining and the weather is heating up? forget it!

i almost let this treat go undocumented until jill requested a summer popsicle recipe. so here you go my jilly. enjoy!

pina colada ice pops
(from gourmet, june 2009)
ingredients:
3 cups chopped fresh pineapple*
1/3 cup well-stirred canned unsweetened coconut milk
1/2 cup water
3 tablespoons superfine sugar
1/3 cup light rum (i used malibu)

puree all ingredients in a blender until smooth, then strain through a fine-mesh sieve (i skipped the straining part) into a large measuring cup, pressing on and then discarding solids (or keep 'em, i think they're yummy). pour into molds. freeze 30 minutes. insert sticks, then freeze until firm, about 24 hours.

and i am happy to report that, unlike my last popsicle endeavor, these happily came out of the molds for proper popsicle enjoyment.

*i was lazy and used canned pineapple. make sure you get the kind in juice not syrup.

-d