Monday, July 25, 2011

peach and pecan upside down cake


nope i'm not dead, the yumcoast isn't dead, we've just been busy.

upon arriving in atlanta just a few weeks ago kris and i have had lots of family/friend hang out time, we've unpacked, slowly acquired furniture and and we also got this little guy, alfonzo! he's been a bit of a distraction. just look at him!

but now that the kitchen* is fully unpacked i'm ready to get back to business. i've missed cooking a lot and i've missed yumcoasting a lot. i've got weird work hours now which means kris is making most of our week night meals (what a sweetie) so i'll be taking advantage of the weekends (and any work at home days i can get!) to cook up a storm for weekend meals and weeknight prep.

sunday night we had our first dinner guests. since my mom and stuart played such a huge part in us getting this house we wanted to have them over pronto to thank them the best way we know how...with delicious food. i made this cake for dessert, with the peaches and pecans it was a fitting first sweet to make in our new home state. the cake is almost banana bread-ish (yum!) which paired really nicely with the crunchy pecans and sweet (white) peaches.


also, please forgive the photos. our new place isn't nearly as bright as our last. plus having a puppy running around while trying to photograph a piece of cake on a low table makes things interesting.

peach and pecan upside down cake
(veganized from bon appetit, august 2009)
ingredients for peach and pecan topping:
1/4 cup margarine
1/2 cup (packed) light brown sugar
pecan halves (about 40)
2 medium peaches, peeled, halved, pitted and cut into wedges
ingredients for cake:
1 1/2 cups all purpose flour
1/2 cup pecans
1 teaspoon baking powder
3/4 teaspoon ground nutmeg
1/2 teaspoon ground cinnamon
1 cup sugar
1/2 cup margarine
2 tablespoons cornstarch mixed with 6 tablespoons water
2 teaspoons vanilla extract
1/2 cup almond milk

peach and pecan topping:

melt margarine in medium saucepan over medium heat. add brown sugar; whisk until sugar dissolves, about 1 minute. pour mixture into 9-inch-diameter cake pan with 2-inch-high sides; spread evenly over bottom of pan (layer will be thin). arrange pecan halves, side by side with round sides down, in circle around outer edge of pan bottom. arrange peach wedges, slightly overlapping, inside circle of pecans, covering pan bottom. set aside while making cake batter.

cake:
position rack in center of oven; preheat to 350°F. combine first 6 ingredients in processor. blend until nuts are finely ground. beat sugar and margarine in large bowl until pale in color, about 4 minutes. whisk cornstarch mixture and vanilla in small bowl until well blended and add to margarine mixture, 1 tablespoon at a time, beating until well blended after each addition. add flour mixture in 3 additions alternately with milk in 2 additions, beating just until blended after each addition. drop batter by large spoonfuls atop pecans and peaches in pan; spread evenly and gently with spatula.

bake cake until golden brown and tester inserted into center comes out clean, about 55 minutes. transfer cake to rack; cool in pan 25 to 30 minutes (do not cool longer or peach layer may stick to pan). run small knife around sides of cake to loosen. place serving platter atop cake pan. using oven mitts, firmly hold cake pan and platter together and invert cake onto platter. let cake rest 1 minute, then very slowly lift off pan. if necessary, rearrange any peach wedges or pecans that may have become dislodged (my peaches came out perfectly! my pecans? not so much...). let cool to room temperature.

*oh you mean the kitchen that is bigger than our old living room? where two people can cook at the same time and have guests hang out? mmhmm.

-d

Thursday, June 9, 2011

fried rice and the weeks ahead...


last weekend kris and i were super productive and got a bunch of stuff packed up....including nearly everything in the kitchen. between the slim pickin's in our cabinets and our busy busy last weeks in san francisco i don't think i'm going to be doing much cooking. i haven't been posting much lately (as you can tell...) and sadly i think it's going to be pretty quiet from my end until we unpack all of our kitchen goodies on the other end. the good news is that i'm sure by that time i will be itching to start cranking stuff out!

but! in all of our packing we did not have a box big enough for the wok so we used it sunday night, along with the bag of sushi rice in the fridge, to whip up some fried rice (see, this isn't a total cop out post). we went to the japanese grocery store for ingredients and i found these tofu strips that i was really excited to try.

i thought they would do double duty as 1. tofu, and 2. a textural substitute for the eggs that are usually in fried rice. and guess what, i was right!

we also got some shishito peppers which added a nice flavor but not a lot of heat.

then it was just lots of garlic, onion and ginger in the wok, then the peppers, tofu then rice and seasoned with sesame oil, soy sauce, chili flakes, dried thai basil and blanched broccoli and snow peas tossed in at the end. oh and garnished with peanuts. delish!


-d

Wednesday, May 18, 2011

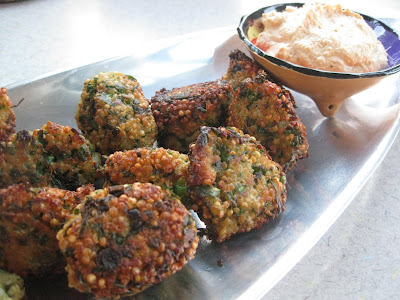
quinoa fritters


these are amazing. so amazing that i want to eat them every day. and easy enough that i probably could. if you watch top chef masters you might recognize these as half of mary sue's winning dish from the fast food challenge a couple of weeks ago. after watching eight? ten? seasons of top chef this is the first time i've ever made one of the recipes. sure, i've seen things on the show that i've thought about making before but then i go look at the recipe and it's too many steps/too many funky ingredients/too not do at home-y (i'm looking at you hector's tofu ceviche). but this was different! so simple there was no excuse not to make them.

i changed the recipe a bit to make it vegan and they turned out so well i have a hard time believing that the original version is any better. seriously. the first thing that makes these awesome is a little step that i alway mean to do when making quinoa but always forget...toasting it! yep, toss the quinoa around in a dry pan over high heat for a few minutes until it smells toasty and then cook as usual, it brings out a fantastic nuttiness in the quinoa that you don't want to miss out on.

the second thing that makes these awesome is that, despite being fried they are not greasy at all. we all know about quinoa's super health properties but i'm wondering if it also has an oil repelling quality because seriously, it's like they soaked up none of the cooking oil.

and the third thing that makes these awesome is crunchy on the outside soft and moist on the inside. perfection.

mary sue served hers with some kind of mayo something or other, i made a batch of aleppo aioli to accompany mine. mary sue served these as a side with quesadilla's, i went with the yuca tortillas from veganomicon. i did not want this dinner to end.

quinoa fritters

ingredients:
2/3 cup quinoa
1 1/3 cups water
2 tablespoons all-purpose flour
1/4 cup nutritional yeast
3/4 teaspoon salt
black pepper, to taste
4 green onions, finely chopped
1/2 bunch italian parsley, chopped
1 tablespoon cornstarch mixed with 3 tablespoons water
spoonful of tahini
oil for frying

place a dry pan over high heat. add quinoa and toast for about 5 minutes, shaking and stirring constantly to prevent scorching. transfer to a pot and add water. bring to a boil, reduce to a simmer and cook, covered, until water is absorbed, about 10 minutes. set aside to cool.in a large bowl, combine cooked quinoa, flour, nutritional yeast, and salt. add onions, parsley, tahini and cornstarch mixture. stir thoroughly with a spoon until the mixture holds together.

heat oil in a large skillet over medium heat. form the quinoa mixture into fritters and add to the oil. fry until the bottoms are golden and brown. turn and fry the second side until golden. drain on paper towels and serve warm.

-d

Friday, May 13, 2011

balsamic basil glazed tempeh


last night's dinner was inspired by the need to make a dent in all those things in our cabinets. as i mentioned before, we're moving! to atlanta! in 7 weeks (not that i'm keeping track or anything)! and while i always try to be mindful of ingredients we already have and using them rather than buying bottles of new things it has now come to the point where it's more than that...it's no longer a little thought i keep in the back of my head, it's a challenge! and though i think it might be physically impossible to use up all of the oils and vinegars and beans and grains and god knows what else in the time we have left i'm going to do the best i can!

this moving business also means that we've been keeping very busy lately. gotta take advantage of our last weeks living out west which means lots of going out and weekend trips. and then there's the work that comes with moving plus regular work and certain nights require an easy, no fuss dinner. often on those nights i turn to my most favorite tempeh recipe, orange glazed tempeh from 101cookbooks. but this night i went a different route, with a different orange glazed tempeh in order to get that bottle of balsamic 1/4 cup closer to empty. and do something with the dried thai basil that has been neglected for so long. i found a recipe online a tweaked it a bit and decided to have an orange glazed tempeh showdown of sorts! so who won? the perfection that is 101cookbooks, duh. but that was to be expected, i mean, there's nothing to do to that recipe that would make it any better.

i would even say that the recipe i made is a different thing altogether. the balsamic and basil overpowered the orange so much that i wouldn't exactly call it orange glazed. it's balsamic basil tempeh, y'all!* and if it were to compete in that category i think it could be a contender. so, here i give you not-orange-glazed tempeh.

balsamic basil glazed tempeh

ingredients:

juice from 2 oranges (about 3/4 cup)
1/4 cup balsamic vinegar
1 tablespoon olive oil
1/2 teaspoon soy sauce
2 cloves fresh garlic, crushed
1/2 tablespoon dried thai basil
1 pack tempeh, sliced

place all ingredients (except tempeh) in a pan and heat. when it starts to boil add the tempeh slices and cook until the liquid has turned into a nice glaze, flipping the tempeh periodically.

*see, there are many ways in which to prepare my return to my southern roots.

-d

Monday, April 25, 2011

roasted artichokes with aleppo aioli


despite living in san francisco for nearly four years now and despite everyone telling us that it's beautiful and wonderful and a must visit and despite the fact that it's perfect weekend-getaway distance kris and i only just went to big sur for the first time this past weekend. maybe the push was that we only have two more months here before our move (to atlanta...yep) or maybe it's that we are, for the first time ever, car owners (super weird) but i'm so glad we made it down there. everyone, you were right, big sur is pretty great. we hiked, we cooked over a campfire, drank wine from a box and relaxed along the bank of the big sur river. it was lovely.

when you drive between san francisco and big sur you get to drive through artichoke land! no, i don't recall exactly what town it's in but you will know you're there when you start passing all of the artichoke fields and produce stands. make sure you stop!


in the past i've always hated cooking artichokes...getting to the heart just seems like so much work for not a lot food. but at 10 for $1 i was willing to give it another shot. plus i told myself that baby artichokes are less intimidating. and also i've been dying to recreate the roasted artichokes with aleppo aioli that we had at pause awhile back. thus, we picked out 20 adorable artichoke babies.
and ya know what? it really wasn't so bad! those baby artichokes are a lot less work than the big guys! and i'd say that by the time i got to number 8 i was on a roll and cruising through those puppies. though i certainly wouldn't think i have any useful insight on the matter...if you're looking for a quick, "proper" way to get to the heart of a 'choke i'm sure there are countless internet people who can help you out way better than me. i'm here to tell you about the aleppo aioli! it's cashew based, has five ingredients, is delicious and it's pink. could you ask for more?

aleppo aioli

ingredients:
1 cup cashews, soaked in water for about an hour*
1/4 cup lemon juice
1/4 cup water (or enough to reach desired consistency)
1 1/2 tablespoons aleppo pepper flakes
pinch of salt to taste

couldn't be easier, place all of your ingredients in a blender or food processor and blend away until nice and creamy and combined. i would recommend adding the pepper gradually to reach your desired spicyness. same with the water, you might need a little more or less.

smear on a plate and plop artichokes on top.

you'll probably have some aioli leftbover to do something else with too. today i spread it on tempeh, coated it with panko and pan fried for some of the crispiest tempeh nuggets i've ever made. highly recommended.

*if you don't have time to soak the cashews no biggie, it just makes them blend up a little easier and a little creamier.

-d

Sunday, April 10, 2011

yeasted coffee cake


when i saw this picture of a yeasted coffee cake on friday i pretty much knew immediately what my sunday baking project would be. i've made, and loved, traditional coffee cakes but never thought to go the yeasted route. thank you vegansaurus for posting that picture because i can say for certain that this is a treat i will turn to again and again. imagine a coffee cake filling swirled within a light sweet bread dough...it's like if coffee cake and cinnamon rolls had a baby. the best part is that there are no super long rise times so you can easily make and eat this in a day, the dough is easy to work with and when it's baking it will make your entire home smell delicious (at least if your entire home is a teeny lil apartment). it's best the day of or day after baking but even after that you can heat it up a bit and it's still quite delicious. i loved the nutty date filling that i made but i also look forward to trying out some variations. you could make a glaze to drizzle over the top as well but i think it's pretty much perfect as is.

yeasted coffee cake
(makes one ring cake)
ingredients for the dough:
2 cups flour
1 1/2 tablespoons sugar
1/4 teaspoon salt
1 1/4 teaspoon yeast
1/3 cup almond milk, with a splash of apple cider vinegar to curdle
1 ounce water (any temperature)
1/4 cup margarine, room temperature
1 container (6 ounces) plain soy yogurt

ingredients for the filling:
1 tablespoon margarine
2 cups pecans, chopped
5 dates, chopped
3/4 teaspoon cinnamon
1/8 teaspoon nutmeg

first, make your dough. combine 3/4 cup of the flour with the sugar, salt and yeast.
in a saucepan, combine almond milk, water and margarine and heat until warm and the margarine is just melted.

on low speed, add the milk/margarine mixture to the dry ingredients and mix until well blended. increase speed to medium and add the yogurt and 1/2 cup more of flour and beat for 2 minutes. stir in enough of the remaining 3/4 cup of flour (or more if needed) so dough holds together. knead for 8-10 minutes until the dough is smooth and elastic.

place in a lightly greased bowl, turning to coat. cover with plastic and let rise for about an hour, until doubled in size.

meanwhile, make your filling by mixing all the ingredients (except the margarine) together.

once your dough has risen roll it out into a rectangle that is about 9x17 (that is the very precise measurement i came up with by comparing my rectangle to my baking sheet). cut off small bits of 1 tablespoons of margarine and spread them around on the dough then sprinkle with your filling evenly covering the dough, leaving a small border around the edges.

starting at the long edge carefully roll your dough into a log and pinch the seam closed. then shape it into a ring and pinch that seam closed. using scissors or a nice sharp knife cut slits all around the ring. place on a parchment/silpat lined baking sheet and cover with plastic wrap. let rise for another hour.

when your dough is almost done rising heat your oven to 350. brush the top of the loaf with almond milk and bake for about 30 minutes, until golden brown.


-d

Sunday, April 3, 2011

wild mushroom ragout


sometimes recipes come from unlikely places. like birthday cards. little did my dad know when he sent this that it was really two gifts in one...the fabulous gift inside as well as a hidden treat in this delicious recipe on the inside cover. this is way more delicious than what you would expect to find inside a card that looks like it was made in the '70s (though the back credits tell me that it is in fact from 1995). no matter! i whipped this up for a week night meal serving it on crusty bread (as the picture shows) and accompanied by a simple salad. i changed the directions a bit as my mushrooms seemed to be unusually slow to release liquid and didn't seem to have that much to release anyway. the point is that with a few less steps i still got a wonderfully buttery, thick glaze covering the mushrooms. oh also, they suggest 1 pound of oyster mushrooms and an additional pound of mixed mushrooms. well oysters are expensive so i say do as i did and mix the two pounds however you want, it's still going to be delicious.

between the two of us this was a lot of food and we had lots of mushrooms left over. we used them the next day as part of a yummy quinoa bowl.

ragout of wild mushrooms
ingredients:
2 pounds mixed mushrooms (oyster, shiitake, chanterells, portobello, crimini...whatever you want!)
4 tablespoons margarine
2 tablespoons shallots
1 1 /2 tablespoons all purpose flour
1/2 teaspoon salt
pinch black pepper
1/2 cup dry white wine
2 tablespoons minced fresh parsley

clean the mushrooms and cut into chunks.

in a heavy bottomed skillet over medium heat, melt the margarine. add the shallots and saute until translucent, 3 or 4 minutes. reduce the heat to low and add the mushrooms. cook, stirring often, until they begin to release their juices and create the beginning of a broth (5 to 10 minutes). raise the heat to medium and sprinkle the flour, salt and pepper over the mushrooms, then stir to evenly coat. add the wine and stir 3 to 4 minutes. by now the mushrooms will have reduced in volume by about one half. keep stirring until you have a nice thick brothy glaze covering all the mushrooms. sprinkle with parsley and serve over crusty bread.

-d