Monday, September 28, 2009

cornmeal bread


kris and i recently got home from bouncing back and forth across the country for two weeks and i'm finally settling back into normal life and getting back to a regular cooking routine. after being away from the kitchen for so long i decided to ease back into things with one of my favorite baking projects - bread. wanting to try something new, i settled on this cornmeal bread which is basically white bread with cornmeal standing in for some of the white flour. the finished product has a light toasty cornmeal taste and a slightly heartier texture than a normal white bread. we used it first to make sandwiches and later to scoop up artichoke dip on our saturday picnic.

cornmeal bread
(adapted so slightly from 1,000 vegetarian recipes)
ingredients:
1 cup soy milk
2/3 cup cornmeal
1/2 cup warm water
1/2 teaspoon plus 2 tablespoons sugar
2 1/4 teaspoons yeast
2 3/4 to 3 1/2 cups all-purpose flour
2 teaspoons salt
3 tablespoons melted margarine

stir together the soy milk and cornmeal; set aside.

in a glass measuring cup, stir together the warm water and 1/2 teaspoon of the sugar. stir in the yeast and set aside for about 5 minutes, until foamy.

in a large bowl (i used my stand mixer) stir together 1 1/2 cups of the flour, the remaining 2 tablespoons sugar and the salt. stir in the yeast mixture, the cornmeal mixture and the melted margarine. stir in 1 cup more of the remaining flour.

turn onto a well-floured surface and knead in enough of the remaining flour until dough is elastic and no longer sticky (or pop in your dough hook and sit back while your mixer does the work).

place the kneaded dough in a large, greased bowl and cover with greased plastic wrap. let sit until doubled in bulk (about an hour or two).

punch dough down and form into a loaf. place in a greased loaf pan. cover with greased plastic wrap and let rise until doubled in bulk (probably an hour or less).

preheat oven to 375. bake for 45 to 55 minutes or until loaf is browned on top and bottom sounds hollow when tapped. cool on wire rack.

-d

Thursday, September 17, 2009

norma's cousin diane. or something like that.


I always want to love Pasta alla Norma, the classic eggplant, tomato, ricotta baked pasta combo. But every time I have it, it's too heavy, and the eggplant is oily, and the overall experience is a huge disappointment. But today at the farmers market, I saw beautiful, skinny japanese eggplants, and all I could think of was Norma! Instead of making the classic, I decided to make a lighter, fresher version, using fresh mozzarella (from Fiore di Nonno) in place of ricotta, a light, slightly spicy fresh tomato sauce, and freshly made rigatoni from DePasquale's in the North End. The end result was exactly what I wanted - nicely melted mozzarella, delicious sauce, and perfectly cooked eggplant.

Here's the recipe - call it what you will!

Serves 4

3 cloves garlic, minced
2 Japanese eggplants, sliced into rounds
1 cherry bomb pepper
5 plum tomatoes, cored and chopped
1 tbsp tomato paste
1 lb. fresh rigatoni
1/2 ball of fresh mozzarella, cut into 1/4 inch slices
basil
salt & pepper

Preheat oven to 350 degrees.

Heat a 4 quart saute pan over medium-high heat. Add olive oil to coat bottom of pan. Once oil shimmers, add the garlic and hot pepper. Saute for one minute, until garlic is fragrant. Add eggplant, and season liberally with salt and pepper. Saute for about 5 minutes, then add the chopped tomatoes and tomato paste. Add a handleful of basil leaves. Cover, and cook, stirring occassionally, for about 10 minutes.


In the meantime, bring the pasta water to a boil, and cook the pasta according to package directions. Drain and return to pot. Add half of the tomato/eggplant sauce, and stir to coat. Pour into oven safe baking dish. Top with remaining sauce, mozzarella, salt and pepper, and a drizzle of olive oil. Bake for 15 minutes, until cheese is melted and starting to bubble.

Serve topped with a chiffonade of basil.


Enjoy!

- e

Tuesday, September 15, 2009

congrats d & kris


This weekend, my friend and c0-blogger married her Kris. The wedding was a blast, and the food was amazing (including the vegan cupcakes pictured above). Congrats guys! xoxo, e

Thursday, September 10, 2009

roasted cauliflower with kalamata vinaigrette


roasting vegetables is never a bad idea and the latest victim to reach our oven was cauliflower. i saw this recipe and, despite the simpleness of the whole thing, was really excited to make it. it's barely more than roasted cauliflower topped with chopped up kalamata olives but it really doesn't need much more than that. roasting gives the slabs of cauliflower a hint of sweetness and nuttiness, which is nicely paired with the salty, brininess of the olives.

roasted cauliflower with kalamata vinaigrette
(from gourmet, september 2009)
ingredients:
1 head cauliflower
1/4 cup olive oil, divided
1 small clove garlic
1 to 2 tablespoons lemon juice (to taste)
1/4 cup pitted kalamata olives, finely chopped
salt and pepper

preheat oven to 450 with rack in lower third.

cut cauliflower lengthwise into 3/4 inch thick slices. put in a large baking pan and toss with 2 tablespoons oil and 1/2 teaspoon each of salt and pepper. roast, turning once or twice, until golden and just tender, about 20-25 minutes.

while cauliflower roasts, mince and mash the garlic to a paste with a pinch of salt, then whisk together with lemon juice, 2 tablespoons olive oil, olives, 1/8 teaspoon salt and 1/2 teaspoon pepper.

drizzle cauliflower with vinaigrette and serve!

-d

Monday, September 7, 2009

grilled "cheese" sammiches


lately, kris has had grilled cheese on the brain. we've previously tasted a few kinds of vegan cheese but found that they either taste weird and/or don't melt well. i've heard that there are some good ones popping up these days but we haven't tasted them because, really, i never liked cheese much anyway and don't miss it. i do, however, love tofutti better-than-cream-cheese. in a stroke of brilliance kris came up with this grilled cheese sandwich that would satisfy both of our tastes and help clean out a few items lingering in the fridge before we leave town in a couple of days. these sandwiches absolutely meet the tasty/melty/crunchy qualities necessary from a grilled cheese sandwich to satisfy that comfort food craving.

we started off with slices from this loaf of bread.

lightly butter one side of each slice. spread the other side with tofutti. we only did tofutti on one side of each sandwich but decided it would be better to do a thinner coat on both sides to make the whole thing stick together better.

layer with thin slices of tomato, red onion and avocado. top with the other piece of bread, buttered side out.

fry in a pan a couple of minutes until the bread is browned and crunchy. carefully flip to get the other side. remove from heat and add thinly sliced pickles. you could add the pickles pre-grilling but we found that they were harder to flip that way and tasted just as good with the pickles added later.

cut in half and enjoy your melty grilled "cheese" sammich!

-d

Monday, August 31, 2009

steamed buns


we just got a bamboo steamer and didn't want to waste any time putting it to work. the original plan was dumplings and buns but, unfortunately, egg-free dumpling wrappers were nowhere to be found. but that's no problem, it just meant two different kinds of buns! and you can never have too many buns, right?

this was my first attempt at steamed buns and i think it went well for the most part. the dough was exactly what i wanted...not too thick and not too heavy, just a nice light compliment to the fillings. the first filling is an earthy tvp (that would be textured vegetable protein) and shiitake mixture, the second is a bright and fresh asparagus one.

as i said, these were a success but that's not to say i didn't learn a few things for my next bun-making venture. one of those lessons would be, don't crowd the steamer! i put 12 in at a time and they really did look like they had plenty of growing room. however when they were done steaming and i took the top off we had a lovely bunch of pull-apart-style steamed buns. that's ok though. the bigger lesson? if you don't have enough room for them all to rise at the same time in the steamer, don't leave the second batch to rise on a baking sheet covered with a damp kitchen towel. the towel will not stay damp and will stick to the top of your buns turning your second batch of buns into a free-form steamed mass of dough and filling. still tasty i'm sure but certainly not something that you can still claim as a bun.

now with that in mind, on to the recipes!

tvp and shiitake filling
ingredients:
1/2 cup tvp
1/4 cup water
1/2 teaspoon fresh grated ginger
1 clove garlic, minced
2 teaspoons soy sauce
2 tablespoons scallions, minced
4 tablespoons shiitakes, minced
1/8 teaspoon ground red pepper

mix the tvp and water to reconstitute. add the rest of the ingredients and mix well. set aside.

asparagus filling
ingredients:
1 tablespoon minced fresh ginger
1 garlic clove, minced
12 ounces fresh asparagus, trimmed and cut into 1-inch pieces
1 8-ounce can water chestnuts, drained
3 scallions, cut into 1-inch pieces
1 teaspoon sesame oil
1 teaspoon soy sauce
1/4 teaspoon coarse salt

place the ginger and garlic in a food processor, and mince. add asparagus and the rest of the ingredients, adding in batches if necessary, and pulse until the ingredients are finely chopped but not pureed. set aside.

steamed bun dough
(makes 24 buns)
ingredients:
1 tablespoon active dry yeast
3/4 cup warm water
2 tablespoons plus 1 teaspoon sugar
1 3/4 cups flour
1/4 teaspoon salt
1 tablespoon vegetable oil
1/2 teaspoon baking powder
lettuce or cabbage leaves, for lining steamer tray

dissolve the yeast in 1/4 cup warm water. Add 1 teaspoon sugar, 1/4 cup flour, and stir to mix well. allow to stand for 30 minutes until bubbly.

mix in remaining warm water, remaining flour and sugar, salt, and vegetable oil. knead until dough surface is smooth and elastic (i used my stand mixer with dough hook for this). roll over in a greased bowl, and let stand until tripled in size, about 2 1/2 hours.

punch down dough, and spread out on a floured board. sprinkle baking powder evenly on surface, and knead for 5 minutes. divide dough into 2 parts, and place the piece you are not working with in a covered bowl. form each half into a log about 2 inches thick. cut logs into 12 1-inch pieces and roll each into a ball. cover with a damp towel.

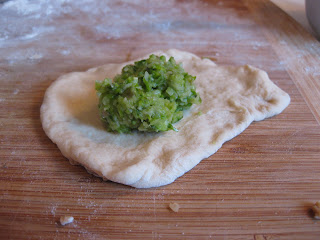
working with 1 piece of dough at a time, press into a thin disc shape. place about 1 tablespoon of filling in center, and then gather up edges and twist to seal, using some extra drops of water to stick together as needed. cover with a damp kitchen towel and repeat with remaining dough.

line bamboo steamer tray with lettuce or cabbage leaves. place buns, sealed side down, in bamboo steamer tray and let rise for 45 minutes (careful not to crowd them). meanwhile, heat water to boiling in a wok or pot to a level just below the bamboo steamer.

place bamboo steamer in wok and steam buns for 20 to 25 minutes, and then remove from heat.

i made a simple dipping sauce of soy sauce, a little water, a little garlic and a bit of hot chili oil.

-d

Thursday, August 27, 2009

lemon and thyme pear compote


i love the combination of fruit and herbs. a little sweet with a little savory equals a lot of delicious! in this case they came together in the form of pears and thyme with a bit of lemon juice thrown in for some tartness. the recipe comes from bon appetit and is paired with a buttermilk cake, which is what i did, but i think that the compote plopped over a scoop of vanilla ice cream would be an equally delicious and oh-so-easy dessert. the recipe below is to top an 8-inch cake. i have a 9-inch cake pan and felt that the pear chunks were a little sparse so if you're making a 9-inch cake i would suggest throwing in a little bit more pear. also, bon appetit provides a buttermilk cake recipe but i just went with the raspberry buttermilk cake (minus the raspberries) because, well, i love it and it's easy.

lemon and thyme pear compote
(from bon appetit, september 2009)
ingredients:
3/4 cup sugar
1/2 cup water
2 1/2 tablespoons fresh lemon juice
1 1/2 teaspoons finely grated lemon peel, divided
1 1/2 teaspoons fresh thyme leaves, divided
1 pound firm but ripe Bosc pears, peeled, halved, cored, cut into 1/2-inch cubes (about 2 1/2 cups)

combine 3/4 cup sugar, 1/2 cup water, lemon juice, 3/4 teaspoon lemon peel, and 3/4 teaspoon thyme in medium saucepan. stir over medium heat until sugar dissolves and mixture boils. remove saucepan from heat; cover. let steep 10 minutes. pour syrup through fine strainer set over bowl. return syrup to saucepan. add 3/4 teaspoon lemon peel and 3/4 teaspoon thyme and bring to simmer. add pear cubes and simmer over medium heat until pears are tender but still hold shape, about 10 minutes. using slotted spoon, transfer pear to rimmed baking sheet (or a plate). boil syrup in saucepan until reduced to 1/3 cup, about 5 minutes (note: mine took a bit longer to reduce). transfer reduced syrup to blender. add 1/3 cup pear pieces; puree until smooth. transfer pear puree to medium bowl. add remaining pear pieces to puree. DO AHEAD: Can be made 1 day ahead. Cover and chill.

to make an upside down cake, grease and flour your cake pan and line the bottom with parchment. bake until golden and almost cooked all the way through. remove from oven and let cool in pan about 15 minutes. once cool, invert onto a flat plate and remove parchment. re-grease the same pan and line bottom with fresh parchment. spread compote over the bottom and carefully place the cake back in the pan. cook until cake is golden and a tester comes out clean. let cool in pan for about 5 minutes and invert onto plate.

-d