Thursday, December 31, 2009
curried no-meat balls
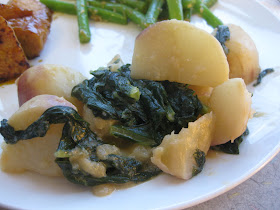
for chrismukkah i got several new cookbooks to add to the collection, one of them is vegan fire and spice by robin robertson. it's a collection of spicy vegan recipes from around the world and i wasted no time breaking it in. first up? the chickpea based curried no-meat balls from india cooked in a yogurty tomato sauce. the book suggested serving them over basmati rice, which i'm sure would be really good and would soak up the sauce well, but we had a rice-y dinner the night before so i served them over smokey sauteed rainbow chard. i really liked the flavors (and that's what really matters) and would make them again but i did have a few issues with the recipe. the balls were very fragile and difficult to brown without crumbling. i found it was easier to brown them in a non-stick pan with the thinnest coating of oil rather than using more oil as the recipe instructed. i did use a potato masher instead of a ricer to mash the chickpeas....maybe that's why. i would also recommend chopping the ingredients for the balls as finely as possible. anyway! here's the recipe, with some notes.
curried no-meat balls
(from vegan fire and spice)
ingredients:
1 1/2 cups cooked or 1 (15.5 ounce) can chickpeas, drained and rinsed
1 small yellow onion very finely chopped, divided
1/4 cup finely chopped peanuts
1/2 teaspoon minced fresh ginger
1 teaspoon fresh cilantro or 1/2 teaspoon dried cilantro
2 teaspoons curry powder
1/4 teaspoon cayenne
salt
olive oil
2 garlic cloves, minced
1 teaspoon ground cinnamon
1/2 teaspoon ground cardamom (i used 2 cardamom pods and removed them before serving)
1/4 teaspoon turmeric
1/2 teaspoon ground coriander
14.5 ounces crushed tomatoes
1 cup vegan yogurt (i used one 6 ounce container. i couldn't find plain so i used vanilla and it was fine)
1 teaspoon chopped fresh parsley
place the chickpeas in a bowl and blot dry. use a potato ricer (or masher) to mash the chickpeas. add half of the chopped onion, the peanuts, ginger, cilantro, 1 teaspoon of the curry powder, 1/8 teaspoon of cayenne and salt to taste. mix well, then shape into 1-inch balls. heat just enough oil to thinly coat a non stick pan and brown the balls on all sides. remove with a slotted spoon and drain on paper towels.
heat another glug of oil on the same skillet. add the remaining onion and brown lightly. add the garlic, cinnamon, cardamom, turmeric, coriander, the remaining 1 teaspoon of curry powder, the remaining 1/8 teaspoon of cayenne and salt to taste. cook, stirring for 2 minutes, then stir in the tomatoes and simmer for 5 minutes, to blend the flavors. remove the pan from the heat and whisk in the yogurt. carefully add the balls to the sauce, and warm over low heat without boiling. serve garnished with parsley.
-d
Wednesday, December 23, 2009
stuffed shells
the original plan for this dinner was manicotti but, upon noticing that every (visible) noodle in every box was broken, i switched my focus to the lovely, intact jumbo shells. same dinner, different look.
there's not so much of a recipe here because, really, stuffed shells is pretty self explanatory. start by cooking the shells* and making a batch of your favorite pasta sauce. drain the shells. pour a thin layer of sauce in the bottom of a baking dish or oven safe pan. stuff your shells with the mixture of your choice. what did i do? i made a batch of cashew ricotta from veganomicon and mixed in one package of thawed frozen spinach. place stuffed shells in baking dish and pour the rest of your sauce on top. cover and bake at 350 for about 40 minutes or until it is sufficiently heated all the way through.
like i said it's not genius or new, but it is super delicious and comfy and a good idea to keep in mind when you want to put a little twist on your normal old spaghetti and red sauce.
*that box of shells is deceiving! or maybe i just have poor dried-pasta-in-a-box to cooked-pasta-as-dinner skills, but as i asked myself....do i cook the whole box? i thought yeah! sure! why not!? we want to have leftovers for lunch. and indeed we do. for about a week.
-d
Sunday, December 20, 2009
holiday baking and candy-making
The weather outside is frightful, as snowflakes spiral through brisk winter air and the streets are blanketed in snow. What better day to stay in with a hot cup of tea, holiday tunes playing, and catching up on the Yumcoast?
Last weekend, in a rush of holiday spirit, I decided to invite my friend Joan (that's her below, sprinkling chopped hazelnuts over the toffee) over for some holiday candy making. I saw this recipe on Smitten Kitchen, and given my love for toffee and all things coffee, just had to make it. As an inexperienced candy maker, I followed the directions to the letter (with one exception – Whole Foods was all out of molasses, so I purchased I deep, dark, rich buckwheat honey. It tastes nearly as rich as molasses, without the bitterness. I can’t wait to use it in other baking projects!), realized that I may have a faulty candy thermometer, and ended up burning the first batch. The second try garnered better results, but erring on the side of caution, we slightly undercooked the sugar, resulting a texture closure to fudge – or, dare I say it, Butterfingers – than a nice, crisp toffee. It is still quite delicious, and I’m thinking of using it in cookies . . .
And because simply making toffee isn’t quite enough for one Sunday afternoon, we also decided to make Ina Garten’s Ultimate Ginger Cookies. The recipe was a little odd for a cookie recipe – oil instead of butter, a very dry dough – but the end result was pleasant. I would like to try making them again, possibly replacing the ground ginger with freshly grated ginger, and attempting to replace the oil with melted butter.
Ultimate Ginger Cookies
From Barefoot Contessa at Home
2 1/4 cups all-purpose flour
1 teaspoon baking soda
2 teaspoons ground cinnamon
1 1/2 teaspoons ground cloves
1/2 teaspoon ground nutmeg
1/2 teaspoon ground ginger
1/4 teaspoon kosher salt
1 cup dark brown sugar, lightly packed
1/4 cup vegetable oil
1/3 cup unsulfured molasses
1 extra-large egg, at room temperature
1 1/4 cups chopped crystallized ginger (6 ounces)
Granulated sugar, for rolling the cookies
Preheat the oven to 350 degrees F. Line 2 sheet pans with parchment paper.
In a large bowl, sift together the flour, baking soda, cinnamon, cloves, nutmeg, ginger, and salt and then combine the mixture with your hands. In the bowl of an electric mixer fitted with the paddle attachment, beat the brown sugar, oil, and molasses on medium speed for 5 minutes. Turn the mixer to low speed, add the egg, and beat for 1 minute. Scrape the bowl with a rubber spatula and beat for 1 more minute. With the mixer still on low, slowly add the dry ingredients to the bowl and mix on medium speed for 2 minutes. Add the crystallized ginger and mix until combined.
Scoop the dough with 2 spoons or a small ice cream scoop. With your hands, roll each cookie into a 1 3/4-inch ball and then flatten them lightly with your fingers. Press both sides of each cookie in granulated sugar and place them on the sheet pans. Bake for exactly 13 minutes. The cookies will be crackled on the top and soft inside. Let the cookies cool on the sheets for 1 to 2 minutes, then transfer to wire racks to cool completely.
Saturday, December 19, 2009
chipotle mushroom squares
basically, this recipe was created around white russians. kris and i have had the drink on our minds for awhile now and last night we finally decided to make vegan white russians (almond milk + kahlua + vodka = delish!). but what food pairs well with white russians? i had no clue as, honestly, i had never had one before. kris suggested mexican which got me thinking that something spicy would be a nice contrast with the cool, creamy beverage. and in an ongoing attempt to use up things that have been hanging around patiently waiting to be eaten, i decided it was about time to do something with that one last sheet of puff pastry in the freezer. thus, chipotle mushroom squares were born! flaky puff pastry topped with a smooth spicy chipotle pinto puree with sauteed mushrooms, these were definitely a successful experiment. after baking i added a bit of simple slaw (cabbage, olive oil, red wine vinegar, salt and pepper) on top for some crunch.
chipotle mushroom squares
1 sheet puff pastry, thawed (pepperidge farm brand is vegan)
pinto puree ingredients:
1 (15 ounce) can pinto beans, drained and rinsed
1 chipotle pepper, from a can packed in adobo sauce
1 tablespoon adobo sauce
juice of 1 lime
1 tablespoon peanut oil
salt to taste
mushroom ingredients:
3 cups (a little less than a pound) mushrooms, chopped (i used a mixture of button and cremini)
1/2 small red onion, finely chopped
2 cloves garlic, minced
1 teaspoon ground cumin
1 teaspoon ground coriander
1/2 teaspoon oregano
1/4 teaspoon crushed red pepper flakes
1/8 teaspoon liquid smoke
salt and pepper to taste
olive oil
first make sure your pastry is thawed. you can thaw it on the counter for 40 minutes.
preheat oven to 400 and lightly grease a baking sheet with olive oil.
to make the puree, put all ingredients in a food processor and blend until smooth. note that this was quite spicy, if you want it less spicy omit the chipotle or only add half.
for the mushrooms, heat a splash of olive oil in a pan and add the garlic and onion. cook until they are softened. add the spices and stir and cook another minute. add the mushrooms and saute until they are softened and begin to release moisture. taste and adjust seasoning if needed. remove from heat.
to assemble the squares first unroll your pastry and lightly brush it with olive oil. cut it into 9 squares. dollop some of the pinto puree onto the center of each square. top each with a spoonful of mushrooms (you will probably have a little of each leftover). bake for about 18 minutes or until the pastry is golden brown.
remove from oven and top each square with a little cabbage slaw and enjoy! white russians not required but highly recommended.
-d
Sunday, December 6, 2009
crunchy soba bowl
i made a soba bowl to go with our tofu satay last week. i decided on a light sauce to drizzle over the noodles to balance out the heavier satay sauce and used vegetables we had on hand for the toppings. i loved the flavors in here but one of my favorite things about this was the contrast of the soft noodles with the crunchy vegetables which resulted in a delightfully fresh and light dish. you could easily swap out the toppings with whatever you may have hanging around but i would recommend leaving them raw if possible or just barely blanching them if needed.
crunchy soba bowl
ingredients:
8 tablespoons soy sauce
3 tablespoons water
1 1/2 tablespoons sesame oil
2 tablespoons mirin
3 small bunches soba
1/2 small head of cabbage, very thinly sliced
1 red pepper, quartered lenthwise and very thinly sliced
1 sheet nori, toasted* and crumbled
8 cloves of roasted garlic, thinly sliced
sesame seeds
cook the soba according to package instructions.
for the sauce, whisk the first four ingredients in a bowl (i must admit i don't remember the exact quantities of each so you might need to add a little more of this or that to adjust. sorry.). set aside.
when the noodles are done cooking assemble your bowl: place noodles in the bottom and drizzle with a bit of the sauce. top with veggies and nori and sprinkle with sesame seeds. drizzle more sauce if desired. enjoy!
*there are two easy ways to toast nori; one is to heat a pan and briefly toast the nori for a few seconds on each side, the other more fun way (if you have a gas stove) is to turn the flame up high and use tongs to wave the nori over the flame for a few seconds until toasted.
-d
Friday, December 4, 2009
tofu satay
a few weeks ago kris and i enjoyed a fantastic tofu satay at lingba lounge and all the while we were savoring every bite to figure out the best way to recreate it at home. kris, being the smartie pants that he is, pointed out that freezing the tofu before hand would give it a nice firm texture. step one settled! from there i thawed the tofu in the fridge for a day then went through a series of cooking techniques to arrive at what i think was a pretty good finished product texture-wise. as far as the satay sauce goes i'm sure it's no where near traditional but it was peanut-y, coconut-y, a little spicy and definitely hit the spot!
tofu satay
ingredients:
1 block tofu, drained, cut into 8 slabs, frozen and thawed in the fridge
for the sauce
5 ounces coconut milk
1/4 cup peanut butter
1/4 onion, grated
1 tablespoon soy sauce
1 teaspoon brown sugar
hot sauce, to taste
to make the sauce, combine all in a saucepan over medium heat. bring to a boil, stirring frequently. remove from heat and set aside.
to cook the tofu heat a non stick skillet over medium heat and cook the tofu slabs for a few minutes on each side until lightly browned and slightly springy. heat a well oiled grill pan and cook the browned tofu on each side until grill mark appear. place on a skewer, dip and enjoy!
-d
Tuesday, December 1, 2009
fettucini with leeks, sunchokes, and kale
I have been a very bad blogger. I'm not really sure what happened . . . or rather, I'm not sure how I have been so lazy about blogging. I'm still cooking, still inventing, but just have not made the time to record things here, on the yumcoast. And last weekend, I decided it was time to remedy the situation, after realizing I had seemingly dozens of recipes - with pictures - just waiting to be shared with you.
On my way home from work, I stopped at Whole Foods. I did not have a plan for dinner, but knew I wanted to make something healthy. My days spent at the cupcakery need to be offset by veggies and other healthy goodies, so I wandered about the produce section, uncertain what to make. I saw kale - both green and purple. Every food magazine on earth extols the virtues of this leafy green, which I enjoy a whole lot more than its friend, Swiss chard. So I picked up a bunch of kale, and leeks were lying right there too, so I grabbed one of those. While I was looking at mushrooms, I saw local sunchokes - from Vermont - and plucked a few of those as well. If you are unfamiliar with the sunchoke - or Jerusalem artichoke - it is a tuber, a relative of the sunflower, with a flavor similar to artichokes. I enjoy their earthy sweetness, and they are rather easy to prepare.
I decided to combine the kale, leeks and sunchokes in a pasta with fettucini and a few white beans. The pasta was rather delicious, and exactly what I wanted. Flavorful, balanced, healthy. and easy!
Fettucini with leeks, sunchokes, and kale
Serves 2-3
1 leek, rinsed, halved, and thinly sliced
4 sunchokes, peeled, rinsed, and sliced
1/2 bunch kale, rinsed and roughly chopped
1/2 cup vegetable stock, preferably homemade
1/2 can cannellini beans
1/2 lb fettucini, cooked according to box directions
Heat 1 tablespoon olive oil in a 4 quart saute pan (or 12 inch frying pan) over medium high heat. Add leeks and cook until softened, 5-10 minutes. Add in sliced sunchokes, season with salt and pepper, and saute for 2-3 minutes. Add vegetable stock and bring to a boil.
In the meantime, bring a small pot of water to boil. Add 1 to 2 teaspoons salt. Add kale and boil for 2 minutes. Drain kale, remove any tough stems, and set aside.
Simmer the leek and sunchoke mixture until most of the liquid has evaporated. Add in white beans, stirring to combine. Add in kale, cooked fettucini. Season to taste with salt and pepper. Serve sprinkled with freshly grated parmesan.
Enjoy!
- e
Monday, November 23, 2009
pumpkin peanut tofu
this is a concoction i made in order to use up the pumpkin leftover from pie making. i had a vision of pan fried tofu cooked in a thick peanut-y pumpkin-y sauce and think i did a pretty good job getting it from my head to our bellies. after the tofu i had quite a bit of extra sauce so a few days later i roasted some parsnips and then when they were almost done cooking tossed them with sauce and roasted a few minutes longer. also yummy!
tomorrow morning we head to atlanta for thanksgiving and i can't wait to see everyone and make loads of delicious food. happy thanksgiving everyone!
pumpkin peanut tofu
ingredients:
1 block tofu, cut into small slabs
1 cup pumpkin puree
2 tablespoons peanut butter
1 cup vegetable broth
2 tablespoons soy sauce
juice of 1 lime
1/8 teaspoon cayenne pepper
1/4 teaspoon cumin
1/4 teaspoon smoked paprika
salt and pepper to taste
toasted pepitas (optional)
chopped fresh cilantro (optional)
to make the sauce, blend all ingredients (except pepitas, cilantro and tofu) with a hand blender, in a normal blender, however you wish, until smooth. set aside.
to toast pepitas, heat a splash of olive oil in large nonstick skillet over medium heat. add pepitas. toss until starting to pop and brown, about 8 minutes; sprinkle with coarse salt and pepper. transfer to plate.
heat a small amount of oil in a pan and cook the tofu until browned in each side. mix a generous amount of sauce into the pan and mix to coat each piece of tofu. continue to cook for several more minutes, tossing the tofu occasionally.
serve topped with pepitas and cilantro.
-d
-d
Friday, November 20, 2009
green beans with pepitas
thanksgiving alert II!
we made these for dinner the other night and decided about two bites in that they were a must for a thanksgiving side. i would highly recommend that everyone makes room on their thanksgiving table for these guys. they are so simple and delicious. the green beans get a nice crunch from the salty pepitas plus a little herb-y boost from the rosemary. and they get bonus points for coming together quickly on the stovetop while the oven is occupied with stuffing and pie and bread and other bake-ables. if you're making these for a large group double the recipe...at least.
green beans with pepitas
(from bon appetit, december 2009)
ingredients:
1 pound slender green beans, trimmed
2 tablespoons olive oil, divided
1/2 cup pepitas (shelled raw pumpkin seeds)
coarse kosher salt
2 teaspoons chopped fresh rosemary*
1 large garlic clove, minced
cook green beans in large saucepan of boiling salted water until crisp-tender and still bright green, about 5 minutes. drain beans and cool in colander. cut beans into 1-inch pieces.
heat 1 tablespoon oil in large nonstick skillet over medium heat. add pepitas. toss until starting to pop and brown, about 8 minutes; sprinkle with coarse salt and pepper. transfer to plate. reserve skillet. DO AHEAD: green beans and pepitas can be prepared 2 hours ahead. let stand at room temperature.
heat remaining 1 tablespoon oil in reserved skillet over medium-high heat. add rosemary and garlic; stir 15 seconds. add beans and pepitas. toss until heated through, about 2 minutes. season to taste with coarse salt and pepper.
*i forgot to buy the rosemary and used dried. probably better with fresh but it was still yummy.
-d
Wednesday, November 18, 2009
penne with hazelnut pesto and green beans
i loved this pasta because it was so bright and green for a winter dinner. green lemony pesto, fresh blanched green beans, little scallion slices....green green green! and yummy too! this is really as simple as cooking up some pasta and giving a few ingredients a whirl in the food processor. the original recipe called for some cheese but it honestly does not need it. kris and i both agreed that the recipe had plenty of flavor and wasn't begging for anything else.
penne with hazelnut pesto and green beans
(from bon appetit october 2009, with slight changes)
ingredients:
2 cups (packed) fresh Italian parsley
2/3 cup hazelnuts, toasted
2 tablespoons fresh lemon juice
1 tablespoon grated lemon peel
2 garlic cloves, peeled
1/3 cup plus 1 tablespoon olive oil
1 14.5-ounce box penne (or a similarly shaped noodle)
8-ounces green beans, trimmed
2 bunches green onions, sliced
blend first 5 ingredients and 1/3 cup oil in processor until nuts are finely chopped. season pesto with salt and pepper.
cook pasta in large pot of boiling salted water until almost tender but still firm to bite, stirring occasionally. add beans; cook until crisp-tender, about 2 minutes.
heat remaining 1 tablespoon oil in nonstick skillet over medium-high heat. add onions; sauté until tender, 3 to 4 minutes.
drain pasta and beans; reserve 1 cup cooking liquid. return pasta and beans to pot. toss with pesto, onions, and 3/4 cup cooking liquid. season with salt and pepper.
-dMonday, November 16, 2009
vegan pumpkin pie
thanksgiving alert!
pumpkin pie is my favorite so this year i decided i need to make a vegan one for thanksgiving. with two weeks until the big day and not wanting to risk a soupy failure i had to start experimenting and fast. i started out by reading several recipes to get an idea of how to approach it. there are many that call for agar as the thickening agent but i find agar to be fussy plus it is super expensive and thus not what i wanted to play around with. i opted for the tofu route and asked my mom for her recipe because, ideally, i wanted it to taste just like hers.
shawn and kate came over for dinner and served as additional tasters. the consensus? taste was spot on! it was slightly looser than i had hoped, however it still cut into nice slices without falling apart. i put the uneaten part in the fridge and by the next evening it had firmed up a bit more.
so my thanksgiving plan? bake this pie the day before, refrigerate, then bring to room temperature before serving.
vegan pumpkin pie
(makes one 9-inch pie)
ingredients:
2 cups canned pumpkin
1/2 cup silken tofu
1 2/3 cups non-dairy milk
1 tablespoon cornstarch
3/4 cup sugar
1/2 teaspoon salt
1 teaspoon cinnamon
1/2 teaspoon ginger
1/4 teaspoon cloves
1 pie crust, unbaked
preheat oven to 350 and have your pie crust in the pie plate and ready to go.
in a large bowl, whisk the cornstarch into the milk until dissolved. add spices and sugar and whisk until combined. add tofu and pumpkin and blend until smooth (i whisked and then used an immersion blender, but you could also just do everything in a blender to begin with)
pour into pie crust and bake for about an hour, until the center looks firm. let cool and refrigerate overnight for optimum firmness.
-d
Thursday, November 12, 2009
mustard!
i have been talking about making mustard forever. i knew it wouldn't be hard. i also knew that, with a large bag of mustard seeds in the cupboard, i probably wouldn't even have to buy anything to make a basic mustard. i looked up recipes online, i looked up recipes in cookbooks and ooh-ed and ahh-ed over them. it's been going on for quite some time now. well finally i actually did it! i think it was the combination of seeing a recipe while flipping through bon appetit for a delicious sounding mustard with bratwurst bites and well it just so happened i made a batch of vegan sausages the other day that were chilling in the fridge begging for some beer and horseradish* mustard. the recipe calls for lager but i used modelo, i don't think it really matters. also, when looking for prepared horseradish make sure you don't get the kind loaded up with cream and eggs, just plain old horseradish. anyway, this is yummy with some kick from the horseradish but not in an overwhelming, sinus clearing way.
beer and horseradish mustard
(from bon appetit, october 2009)
ingredients:
(makes about 1 cup)
1 cup beer, divided
2/3 cup malt vinegar or red wine vinegar
1/3 cup whole mustard seeds (brown or yellow)
2 tablespoons dry mustard
1/4 cup prepared white horseradish
1 teaspoon coarse kosher salt
1 teaspoon freshly ground black pepper
1 tablespoon honey
1/4 teaspoon caraway seeds, finely ground
2 teaspoons cornstarch mixed with 1 tablespoon water
whisk 1/2 cup beer, malt vinegar, mustard seeds, and dry mustard to blend in small bowl. let mixture stand at room temperature 3 hours.
transfer beer-and-mustard-seed mixture to blender; add remaining 1/2 cup beer, horseradish, 1 teaspoon coarse salt, 1 teaspoon pepper, honey, and ground caraway seeds; blend until coarse puree forms. transfer mixture to medium metal or glass bowl. set bowl over saucepan of simmering water and whisk often until mixture thickens slightly, about 15 minutes (mixture will be thinner and more sauce-like than store-bought mustard). transfer mustard to small saucepan and add cornstarch mixed with 1 tablespoon water; whisk over medium-high heat until mustard thickens and boils, about 2 minutes. transfer mustard to airtight container. cover and chill until cold. will keep in the fridge for about a week.
*horseradish, much like sauerkraut, is a food i never liked. i think my change of heart towards the kraut inspired me to give horseradish another go. and i like it! i mean....i wouldn't eat spoonfuls of it but it's much better than it was when i was a kid choking it down on a piece of matzoh at our passover seder ever year. that was the worst.
-d
Monday, November 9, 2009
foodbuzz and fancy cooking
and of course tasting and talking about food all day put me in the mood to cook cook cook.
sunday started off by forgoing our usual weekend bagel trip for homemade breakfast of waffles and tempeh bacon (devoured...not pictured).
then what for dinner? well anytime we're looking for a big dinner project the artful vegan seems to be the place to turn. i think this was the first time i actually made complete recipes from there...usually they overwhelm me so i just pick and choose bits from a few recipes and put them all together in my own way. somehow it seems less daunting that way. this time we chose three appetizers to make (please forgive the poor lighting, setting the clock back is bad for food blogging)....
olive, eggplat and black beluga lentil caviar on toasted crostini
cumin-balsamic roasted mushrooms
heirloom tomato stack with bitter greens, avocado, basil and curried hazelnut mojo dressing
all in all a fun and delicious weekend!
-d
Thursday, November 5, 2009
leeky brussels slaw
this is just a quick lil side dish i whipped up the other night. everything is sliced very thin so it cooks in no time! i think brussels sprouts slaws are also a good way to get those who claim to hate the sprouts to change their minds. anyway, kris said it was really good so i snapped a picture and decided to share.
leeky brussels slaw
ingredients:
1 leek, white and pale green parts thinly sliced
1/2 pound brussels sprouts, thinly sliced
1/2 tomato, diced
sprinkle of paprika
sprinkle of crushed red chili flakes
coarse salt to taste
olive oil for cooking
put enough oil in a pan to coat the bottom and heat over medium. add the leeks and saute until they begin to soften. add tomatoes and sprouts and cook a few minutes until sprouts are softened and bright green. add spices to taste and you're done!
-d
Tuesday, November 3, 2009
chocolate chunk zucchini muffins
my mom makes the. best. zucchini cake. it is light and moist and amazingly delicious and she serves it with fresh whipped cream. it really is fantastic. i haven't tried making a vegan version of her recipe (though after writing that it has shot to the top of my to do list) but when i saw this recipe in gourmet i imagined her cake in cupcake form with chocolate. well....that's not quite what i got. according to gourmet these are cupcakes but i'm calling them muffins because they are really much denser than the ideal cupcake should be. plus they don't have any frosting on them so they don't have that cupcake-y feel when you're eating them.
however! i'm not saying these are bad. no no no...put yourself in a muffin state of mind and they will hit the spot. they are full of chocolatey goodness and with the flecks of green zucchini you can trick yourself into believing that they are healthy and a perfectly acceptable breakfast muffin. i made slight alterations to the recipe 1. to make it vegan and 2. based on what i had on hand.
chocolate chunk zucchini muffins
(from gourmet, september 2009)
ingredients:
1 1/2 cups all-purpose flour
2 tablespoons unsweetened cocoa powder
1/2 teaspoon cinnamon
1/2 teaspoon baking soda
1/4 teaspoon baking powder
1/4 teaspoon salt
3/4 cup plus 2 tablespoon sugar
1/2 cup vegetable oil
1/4 cup plain non-dairy yogurt
1/2 teaspoon pure vanilla extract
1 cup zucchini, coarsely grated
4 ounces semisweet chocolate, coarsely chopped
preheat oven to 350°F with rack in middle.
whisk together flour, cocoa, cinnamon, baking soda, baking powder, and salt.
whisk together sugar, oil, yogurt, and vanilla in a large bowl until thick and creamy, 2 to 3 minutes. mix in flour mixture until just incorporated. stir in zucchini and chocolate chips.
divide among lined muffin cups and bake until tops spring back when lightly pressed, 30 to 35 minutes. cool in pan 5 minutes, then turn out to cool completely.
-dThursday, October 29, 2009
stir fry sauce
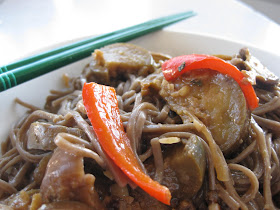
i found the prettiest chinese eggplants and the cutest teeny tiny shiitake mushrooms at the farmers market last week and made a delicious stir fry with them, along with some red bell pepper, onion and lots of ginger and garlic, served over soba. rather than using the soy vay from the fridge, i decided to make my own stir fry sauce. i didn't have a plan which is why there are 11 ingredients in it. true, i probably could have made something just as good with a fraction of the ingredients but sometimes it's fun to just start pouring things in a bowl and see where you end up. i ended up with something very tasty.
stir fry sauce
ingredients:
2 tablespoons white miso
2 tablespoons soy sauce
1 tablespoon vegetarian (mushroom based) oyster sauce
2 tablespoons mirin
1 tablespoon sesame oil
1 tablespoon rice vinegar
3 tablespoons canola oil
1 teaspoon tamarind concentrate
1 tablespoon sugar
2 teaspoons pomegranate molasses
pinch of dried thai basil
mix everything together!
-d
Monday, October 26, 2009
succotash
kris found a succotash recipe online called autumn vegetable succotash. really i would call it more of a summer vegetable succotash with the zucchini, yellow summer squash and corn but pish posh that's really not important. the good news is that you can probably still find many of these ingredients at your local farmer's market and whip them up into a bright, fresh meal in no time. the original called for lima beans but i was all out of those so i used shelled edamame instead. also i was so ready to make this that i totally missed the part where it says it makes 8 servings. in order to save you from having succotash for days*, i cut it all in half below.
succotash
ingredients:
olive oil
1/2 medium onion, diced
1 clove garlic, finely chopped
1 red bell peppers, diced
1 zucchini, diced
1 yellow summer squash, diced
1/2 cup frozen shelled edamame
1/2 cup fresh or frozen corn kernels
salt and pepper to taste
1 tablespoons fresh sage, coarsely chopped
heat enough olive oil to coat your skillet over medium-high heat. add onion; cook until translucent, 2 minutes. add garlic, bell pepper, zucchini, squash, edamame, and corn. season with salt and black pepper; cook, stirring, until vegetables are tender, 10 minutes. stir in sage, and serve (we served it over black rice).
*though may i say that the open faced crispy succotash tacos i made for lunch one day were really, really good?
-d
Thursday, October 22, 2009
turnips with miso
i'm always looking for new vegetable side dish ideas and i never ever think of turnips so this one was especially exciting. i loved the earthiness of the turnip paired with the smooth mellow miso butter and just a hint of bitterness from the greens. the original recipe calls for japanese turnips with the greens still attached. well i struck out twice on that one as i could not find japanese turnips or any turnips at all with greens attached. to make do i just picked out the smallest purple topped turnips i could find and bought a separate bunch of turnip greens. i also subbed margarine for butter. this is a delicious, quick and easy side dish that i will definitely make again!
turnips with miso
(gourmet, september 2009)
ingredients:
3 tablespoons white miso
3 tablespoons margarine, softened, divided
3 pounds small (1 1/2-to 2-inch) turnips with greens (or 1 bunch turnip greens)
1 1/3 cups water
2 tablespoons mirin
stir together miso and 2 tablespoon margarine.
coarsely chop turnip leaves. halve turnips (leave whole if tiny) and put in a heavy skillet along with water, mirin, remaining tablespoon margarine, and 1/8 teaspoon salt. bring to a boil over medium-high heat, then boil, covered, 10 minutes.
add greens by handfuls, turning and stirring with tongs and adding more as volume in skillet reduces. cover and cook 1 minute. uncover and continue boiling, stirring occasionally, until turnips are tender and liquid is reduced to a glaze, about 5 minutes. stir in miso butter and cook 1 minute.
-d
Friday, October 16, 2009
orzo with lima beans and tempeh
we had our first rainy day of the season. it was a downpour...all.day.long. one of the beauties of unemployment is that, in the occasion of a monsoon, it is (usually) not absolutely necessary to leave the house. my goal was to make dinner with things we had in so that i could stay nice and dry and enjoy the storm from the safety and dryness of the apartment. we were running low on fresh vegetables (does half an onion count?) but luckily there was half a bag of frozen lima beans in the freezer. we also just did a shopping at rainbow and stocked up on tempeh so that was in. here's what i decided on for the main meal components:
first things first i roasted the garlic.
then i made a marinade for the tempeh with the beer, a squeeze of lime, soy sauce, peanut oil, cumin, coriander and chili powder. let the tempeh sit in it for a bit then pan fry to get it nice and crunchy on the outside pouring in the marinade as it cooks to get a little glaze on the outside.
to put it all together i caramelized the onions then sauteed the limas with olive oil and salt and pepper. i chopped up the roasted garlic cloves and added them to the pan.
when the orzo was done cooking i tossed it all together and lo and behold it was quite yummy. and i stayed perfectly dry and got to stay in my loungy cashmere-like pants all day long.
-d
Tuesday, October 13, 2009
pineapple basil vinaigrette
a few days ago i had leftovers and salad for dinner. not wanting it to be boring, i decided to do a little something different with the salad dressing in order to keep things interesting. i did a quick scan of the kitchen and saw basil and pineapple....done! i blended this with our immersion blender but a food processor or regular blender would work as well. i think this dressing would also be tasty tossed with a grain as the base of a dinner bowl.
basil pineapple vinaigrette
ingredients:
1 1/2 tablespoons fresh basil, chopped
1/4 cup (heaping) pineapple, chopped
2 tablespoons olive oil
1 tablespoon champagne vinegar
salt and pepper to taste
blend all ingredients and pour it over the dish of your choice.
here it is in action:
-d
Thursday, October 8, 2009
pickled collard greens with pineapple
i saw this recipe in gourmet* and was too intrigued not to give it a go. luckily kris was down with the plan too. i thought it would either be really good...or just gross. but i like collards, i like pineapple and i like pickling so i figured how bad could it be? luckily not bad at all! the sweetness of the pineapple played off the briny collards to create a lovely balance of flavors. it's also a quick recipe (as far as pickling goes) so you could definitely whip it up for a dinner side with a little bit of planning. i cut the recipe (as show below) in half and it still made more than we could finish with dinner the first night and leftover the second. gourmet notes that this can be made 4 days ahead and chilled but i must say that, as much as i love leftovers, i thought this was much better the first day than the second.
pickled collard greens with pineapple
(from gourmet, september 2009)
ingredients:
1/2 cup white-wine vinegar
1/2 cup cider vinegar
1 medium onion, thinly sliced
4 garlic cloves, finely chopped
1 tablespoon sugar
1/4 teaspoon cayenne
1 Turkish or 1/2 california bay leaf
4 1/2 pounds collard greens (about 3 bunches), stems discarded and leaves cut crosswise into 1-inch-wide strips
1 cup chopped (1/3 inch) fresh pineapple
bring vinegars, onion, garlic, sugar, cayenne, bay leaf, and 1 1/2 teaspoons salt to a simmer in a small saucepan, then remove from heat and let steep 15 minutes. discard bay leaf.
meanwhile, cook collard greens in a large pot of well-salted boiling water until just tender, 6 to 8 minutes. drain well in a colander, pressing to squeeze out excess water.
transfer greens to a large bowl, then add pineapple and vinegar mixture and toss to coat. cool to room temperature, tossing occasionally, about 1 hour. serve chilled or at room temperature.
*and can i mention how sad i am that gourmet is dead? on the bright side, maybe it will encourage me to look through all my back issues and re-find the recipes i want to try.-d
Monday, October 5, 2009
caribbean sweet potato gratin
i love casseroles because they are an easy way to pack in a hearty meal with only a little bit of effort. i also like things that let me use some of our new kitchen toys. i decided to make this recipe from moosewood for those reasons and also because it's a little something unexpected from a gratin. sweet potatoes instead of regular ones, coconut milk instead of cream or cheese, lots of fresh spinach and a little bit of tang from the limes. delicious! note that the recipe calls for cooked rice so if you don't have any already made get that cooking first. i also chopped up the full bunch of spinach and used way more than called for.
caribbean sweet potato gratin
(from moosewood restaurant new classics)
ingredients:
1 garlic clove, minced or pressed
1 1/2 teaspoons lime zest
2 tablespoons fresh lime juice
2 tablespoons chopped fresh cilantro
1/2 teaspoon dried thyme
1 1/2 teaspoons salt
1/2 teaspoon black pepper
2 1/2 cups (20 oz) coconut milk
4 cups (about 1 1/2 pounds) sweet potatoes, thinly sliced
1 cup cooked rice
15 oz can black beans, drained
1 1/2 cups fresh spinach, thinly chopped
topping:
3/4 cup cornmeal
1 tablespoon vegetable oil
1/2 teaspoon dried thyme
1/4 teaspoon ground cumin
1/4 teaspoon salt
preheat oven to 350 and lightly oil a 9x13 baking pan.
combine the garlic, lime zest and juice, cilantro, thyme, salt, pepper and coconut milk. pour one third of this mixture into the prepared baking pan. layer half of the sweet potatoes in the bottom, topped by half the rice, half of the beans and half of the spinach. pour on another third of the coconut milk mixture and repeat the layers of potatoes, rice, beans and spinach. pour the remaining coconut milk mixture over all.
in a small bowl combine all of the topping ingredients and sprinkle over gratin.
bake, uncovered for about 60 minutes, rotating the pan after 30 minutes. when the potatoes are tender and the topping is crisp and golden brown, remove from the oven and let sit for a few minutes until the potatoes absorb any remaining liquid.
-d
Monday, September 28, 2009
cornmeal bread
kris and i recently got home from bouncing back and forth across the country for two weeks and i'm finally settling back into normal life and getting back to a regular cooking routine. after being away from the kitchen for so long i decided to ease back into things with one of my favorite baking projects - bread. wanting to try something new, i settled on this cornmeal bread which is basically white bread with cornmeal standing in for some of the white flour. the finished product has a light toasty cornmeal taste and a slightly heartier texture than a normal white bread. we used it first to make sandwiches and later to scoop up artichoke dip on our saturday picnic.
cornmeal bread
(adapted so slightly from 1,000 vegetarian recipes)
ingredients:
1 cup soy milk
2/3 cup cornmeal
1/2 cup warm water
1/2 teaspoon plus 2 tablespoons sugar
2 1/4 teaspoons yeast
2 3/4 to 3 1/2 cups all-purpose flour
2 teaspoons salt
3 tablespoons melted margarine
stir together the soy milk and cornmeal; set aside.
in a glass measuring cup, stir together the warm water and 1/2 teaspoon of the sugar. stir in the yeast and set aside for about 5 minutes, until foamy.
in a large bowl (i used my stand mixer) stir together 1 1/2 cups of the flour, the remaining 2 tablespoons sugar and the salt. stir in the yeast mixture, the cornmeal mixture and the melted margarine. stir in 1 cup more of the remaining flour.
turn onto a well-floured surface and knead in enough of the remaining flour until dough is elastic and no longer sticky (or pop in your dough hook and sit back while your mixer does the work).
place the kneaded dough in a large, greased bowl and cover with greased plastic wrap. let sit until doubled in bulk (about an hour or two).
punch dough down and form into a loaf. place in a greased loaf pan. cover with greased plastic wrap and let rise until doubled in bulk (probably an hour or less).
preheat oven to 375. bake for 45 to 55 minutes or until loaf is browned on top and bottom sounds hollow when tapped. cool on wire rack.
-d
Thursday, September 17, 2009
norma's cousin diane. or something like that.
I always want to love Pasta alla Norma, the classic eggplant, tomato, ricotta baked pasta combo. But every time I have it, it's too heavy, and the eggplant is oily, and the overall experience is a huge disappointment. But today at the farmers market, I saw beautiful, skinny japanese eggplants, and all I could think of was Norma! Instead of making the classic, I decided to make a lighter, fresher version, using fresh mozzarella (from Fiore di Nonno) in place of ricotta, a light, slightly spicy fresh tomato sauce, and freshly made rigatoni from DePasquale's in the North End. The end result was exactly what I wanted - nicely melted mozzarella, delicious sauce, and perfectly cooked eggplant.
Here's the recipe - call it what you will!
Serves 4
3 cloves garlic, minced
2 Japanese eggplants, sliced into rounds
1 cherry bomb pepper
5 plum tomatoes, cored and chopped
1 tbsp tomato paste
1 lb. fresh rigatoni
1/2 ball of fresh mozzarella, cut into 1/4 inch slices
basil
salt & pepper
Preheat oven to 350 degrees.
Heat a 4 quart saute pan over medium-high heat. Add olive oil to coat bottom of pan. Once oil shimmers, add the garlic and hot pepper. Saute for one minute, until garlic is fragrant. Add eggplant, and season liberally with salt and pepper. Saute for about 5 minutes, then add the chopped tomatoes and tomato paste. Add a handleful of basil leaves. Cover, and cook, stirring occassionally, for about 10 minutes.
In the meantime, bring the pasta water to a boil, and cook the pasta according to package directions. Drain and return to pot. Add half of the tomato/eggplant sauce, and stir to coat. Pour into oven safe baking dish. Top with remaining sauce, mozzarella, salt and pepper, and a drizzle of olive oil. Bake for 15 minutes, until cheese is melted and starting to bubble.
Serve topped with a chiffonade of basil.
Enjoy!
- e
Tuesday, September 15, 2009
congrats d & kris
Thursday, September 10, 2009
roasted cauliflower with kalamata vinaigrette
roasting vegetables is never a bad idea and the latest victim to reach our oven was cauliflower. i saw this recipe and, despite the simpleness of the whole thing, was really excited to make it. it's barely more than roasted cauliflower topped with chopped up kalamata olives but it really doesn't need much more than that. roasting gives the slabs of cauliflower a hint of sweetness and nuttiness, which is nicely paired with the salty, brininess of the olives.
roasted cauliflower with kalamata vinaigrette
(from gourmet, september 2009)
ingredients:
1 head cauliflower
1/4 cup olive oil, divided
1 small clove garlic
1 to 2 tablespoons lemon juice (to taste)
1/4 cup pitted kalamata olives, finely chopped
salt and pepper
preheat oven to 450 with rack in lower third.
cut cauliflower lengthwise into 3/4 inch thick slices. put in a large baking pan and toss with 2 tablespoons oil and 1/2 teaspoon each of salt and pepper. roast, turning once or twice, until golden and just tender, about 20-25 minutes.
while cauliflower roasts, mince and mash the garlic to a paste with a pinch of salt, then whisk together with lemon juice, 2 tablespoons olive oil, olives, 1/8 teaspoon salt and 1/2 teaspoon pepper.
drizzle cauliflower with vinaigrette and serve!
-d
Monday, September 7, 2009
grilled "cheese" sammiches
lately, kris has had grilled cheese on the brain. we've previously tasted a few kinds of vegan cheese but found that they either taste weird and/or don't melt well. i've heard that there are some good ones popping up these days but we haven't tasted them because, really, i never liked cheese much anyway and don't miss it. i do, however, love tofutti better-than-cream-cheese. in a stroke of brilliance kris came up with this grilled cheese sandwich that would satisfy both of our tastes and help clean out a few items lingering in the fridge before we leave town in a couple of days. these sandwiches absolutely meet the tasty/melty/crunchy qualities necessary from a grilled cheese sandwich to satisfy that comfort food craving.
we started off with slices from this loaf of bread.
lightly butter one side of each slice. spread the other side with tofutti. we only did tofutti on one side of each sandwich but decided it would be better to do a thinner coat on both sides to make the whole thing stick together better.
layer with thin slices of tomato, red onion and avocado. top with the other piece of bread, buttered side out.
fry in a pan a couple of minutes until the bread is browned and crunchy. carefully flip to get the other side. remove from heat and add thinly sliced pickles. you could add the pickles pre-grilling but we found that they were harder to flip that way and tasted just as good with the pickles added later.
cut in half and enjoy your melty grilled "cheese" sammich!
-d